Introduction
The reflections unit was an opportunity to reflect upon myself and who I am as a person. Many of the projects throughout English, Digital Media, and Animation were centered around that concept. In English, I wrote a personal essay that demonstrated my core values and vulnerability. In Digital Media, I created a Mandala that showed my personal artistic flair as well as motion graphics using After Effects. In Animation, I learned how to use Maya, ZBrush, and Substance Painter to create beautiful 3D models.
Through this unit, I learned that I am capable of creating so much more than I thought I could. In all of my classes, I learned how to think and create in unique ways that challenged my creative process. All of my projects thus far reflect my core values which I have assembled in a video using text animations.
Core Values Video
Mandala
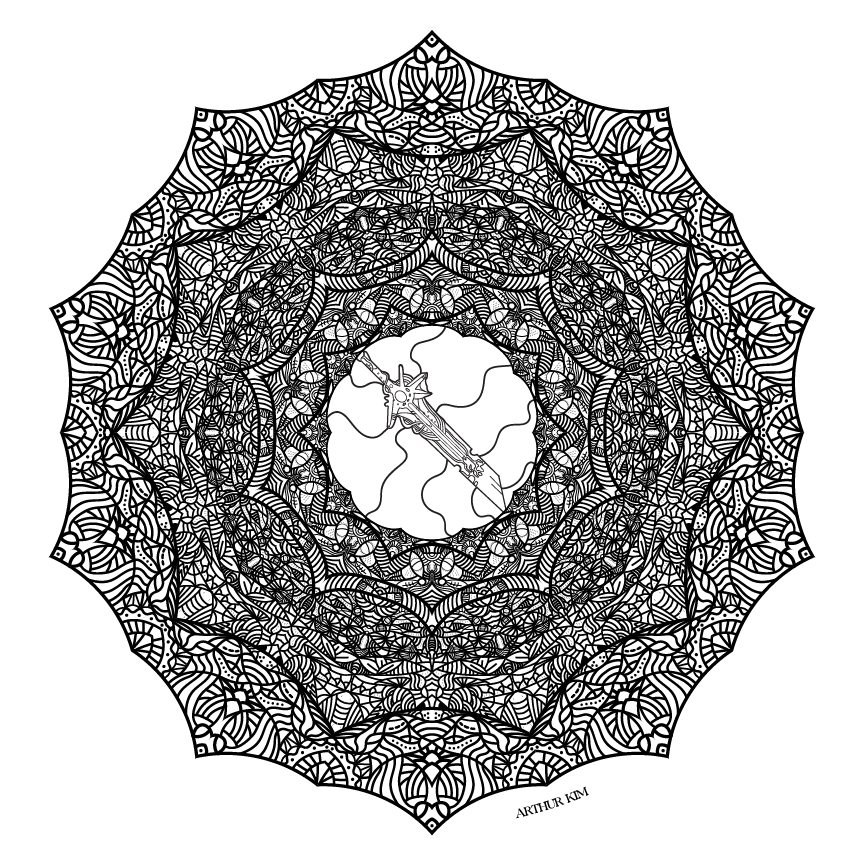
A mandala is a circular piece of artwork where the artist draws only one section of a circle, which then repeats all the way around. To create my mandala, I used Adobe Illustrator. After first creating various templates with different numbers of slices, I chose one and began drawing patterns using the digital pen. Once the Black & White version was complete, I colored the mandala in Illustrator. The Black & White version was then carved onto a slab of bamboo, which was the final product.
Black & White Mandala Artist Statement
Violent Nature was an attempt at creating a design with form and structure, unlike my previous mandala which was mostly just random strokes and lines. When I started this mandala, I knew I wanted a unique centerpiece, so I left the middle blank. I began drawing distinct shapes just outside the center region, working my way outwards while also increasing my stroke size. What I ended up with was a pattern that looked natural and overgrown while also containing easily colorable gaps. In the center, I decided to draw a sword, which is a recurring theme throughout some of my works but also contrasts the nature nicely. Overall, I am proud of the design of the mandala, but I would definitely change how I drew it–the pen tool would have given me much more precise lines but I opted to use the brush instead. I think the name “Violent Nature” perfectly describes the mandala, with the balance between the sword and nature.
Colored Mandala Artist Statement
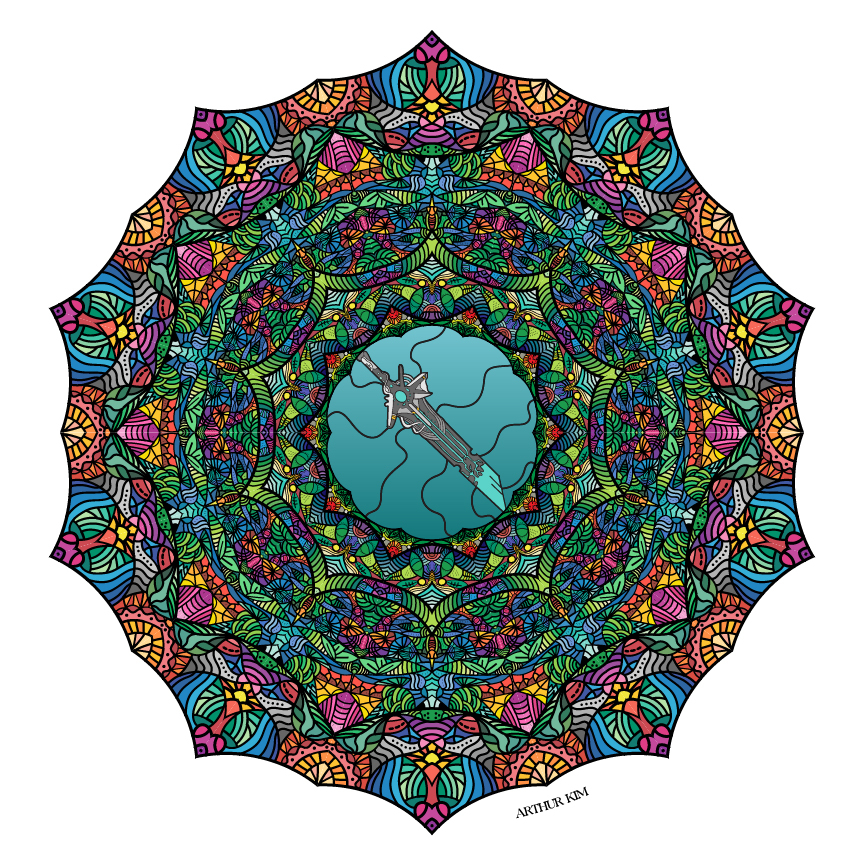
Having already established that Violent Nature looked very natural, I chose to use a variety of vibrant and bright colors to fill in the many gaps between the strokes. I tried to use all of the colors of the rainbow, although not all of them are used equally. I didn’t have any ideas in terms of color before I began, so I just picked random colors that I thought looked good. The sword was actually traced from an image in Illustrator, so I already had reference colors for it–mainly gray and blue. All in all, I think the colored rendition definitely makes my mandala stand out more and gives it an extra layer of depth. However, I also would have liked to try sticking to one specific color theme instead of using many different colors, as it could make the mandala more cohesive.
Laser Engraved Mandala + Artist Statement
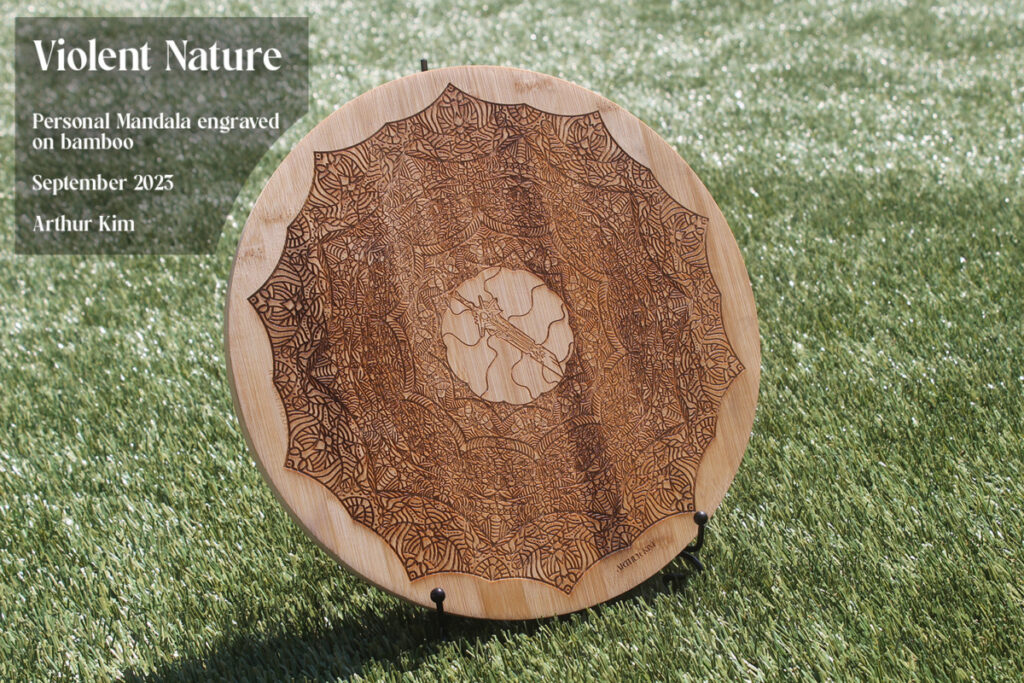
For the final photo, I wanted something that looked simple to draw focus towards the mandala itself. I went for a slightly angled shot with a clean grass background, using the sunlight to illuminate the engraving. I think the most difficult part of this project was the coloring phase–live paint was a struggle to get working, but I was able to get it done nonetheless. Overall, I am satisfied with how the carving turned out, and the process of creating the mandala really challenged my Illustrator skills. In the future, I hope to be able to produce more physical artwork such as the mandala using Photoshop and Illustrator.
Mandala Build Reveal Video
Personal Essay
The personal essay was a genuine reflection of myself and my values. It was intended to be used for the Common Application, being under 650 words. In order to answer the question “Who am I?” I pulled different experiences from my life that showed personal growth and vulnerability. To make the essay sound personal, I created metaphors for my journey through life as a digital artist and programmer and included impactful moments throughout that experience.

Motion Graphics
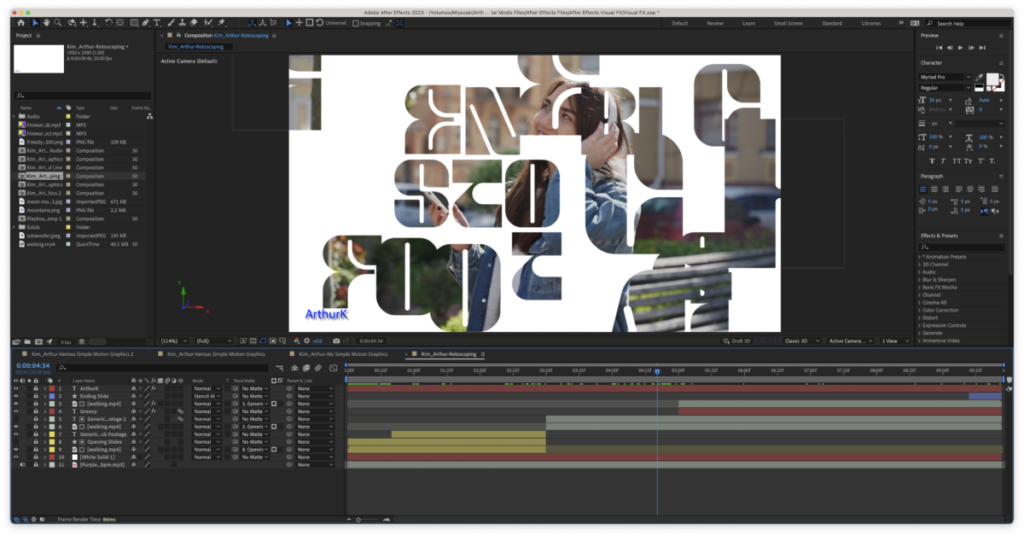
Using Adobe After Effects, I learned how to create various types of motion graphics. This included text animation, animating strokes and bursts, audio syncing, and rotoscoping. Below is a screenshot of the process:
In total, I produced 3 separate videos focusing on different aspects of motion graphics
Audio Visualizer
The first was an audio visualizer where I synced a waveform and the size of the background to a music track.
Fireworks Scene
The second video was a showcase of simple motion graphics where I animated trails and bursts to create a fireworks scene.
Rotoscoping & Text Animation
The third video was an advertisement-style production where i used rotoscoping and text animations to create cool effects.
Overall Thoughts
Motion graphics are a great way to make any video production of any style stand out more. Knowing how to utilize After Effects to create certain visuals has really taught me how flexible and powerful After Effects is, especially when it comes to text animation and rotoscoping. I hope to use these skills in future endeavours.
ZBrush
ZBrush is a program I used extensively throughout Animation to sculpt and add detail to my Maya models. It is an extremely powerful tool that has a vast array of brushes, alphas, and materials. Using ZBrush alone, I created two models: a skull and a head. I also made other models using ZBrush and then textured them with Substance Painter, so those will be featured under the Substance Painter section.
Skull
The first thing I made with ZBrush was a skull. Primarily using the move, smooth, and damien standard brushes, I sculpted a detailed human skull. Having never used the program before, I think it turned out quite well.
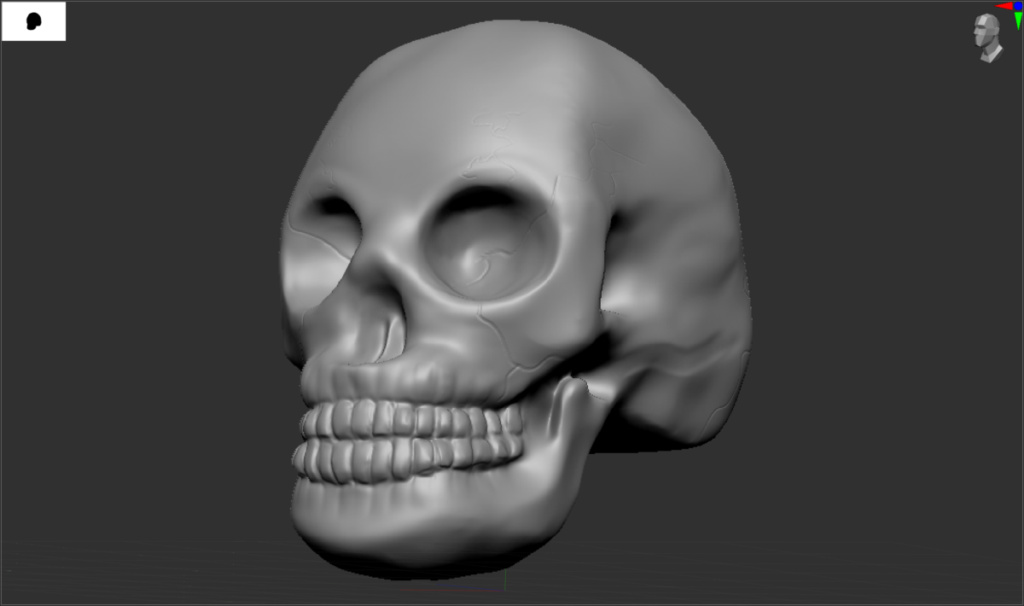
The process was quite simple. I first used the move brush to generally sculpt the shape of the skull. This is the most important part because if the shape isn’t correct, then the model won’t look good regardless of how much detail it has. Next, I used the same move brush to carve out large spaces such as the eye sockets and nose. Then I smoothed out the model with the smooth brush. Once that was done, I used the damien standard and clay buildup brushes to add the smaller details such as the teeth, cheekbones, and cracks. Each time I started to add greater detail, I subdivided the mesh which essentially increased the resolution of the model (think of it like upscaling an image).
Head
I also created a head model using ZBrush. This time, I focused more on getting the different parts of the face and head to look like a human, which was difficult at times. Despite this, I think it turned out well.
Again, the process was similar to the skull. Using a reference image I found online, I started out sculpting the general shape with the move brush, and then started to add details using damien standard and clay buildup. However, this model has some higher fidelity details than the skull, so I had to subdivide the mesh more to account for the greater detail. For example, the subtle skin creases and the detail in the eyes and ears required me to use much smaller brush sizes. The hair was the most difficult part, as it was hard getting it to look somewhat natural.
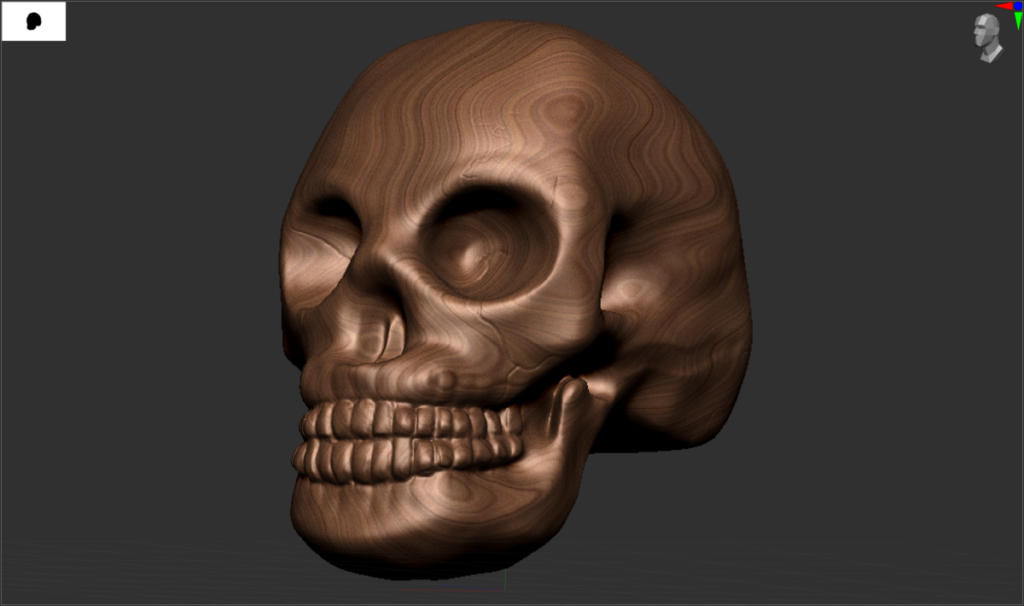
Substance Painter
Adobe Substance Painter is what I used to texture my ZBrush models. It features a library of different textures such as metal, fabric, and plastics. All you need to do is paint over the model with your brush. In addition, Substance Painter has a special type of texture called “smart materials” which uses the geometry of the mesh to create a more realistic and varied look. Each texture can have its own layer, and each layer can be blended using blend modes (like Photoshop). All of the models I textured using this program were started in Maya; these include the table, weapon, and character.
Table
The table scene began as a simple Maya model, which was actually the first thing I made during Senior year in Animation. Afterwards, I did some minor sculpting in ZBrush, but since I was going for a modern and minimal look, I didn’t really change much. The table itself is a simple office/desk setup, featuring a monitor setup, a lamp, books, a cup, and a chair. The final Substance Painter render is shown below:
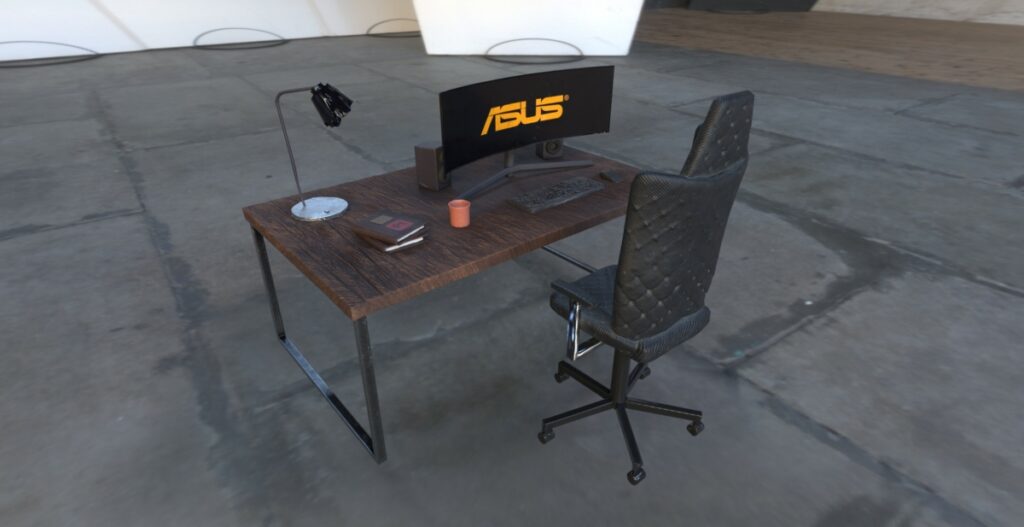
The lamp, keyboard, and mouse got distorted when I imported the table into ZBrush, which I couldn’t really do anything about. However, I am satisfied with everything else. I started with a wood base, and then used a metallic texture for the base of the lamp, the table supports, and parts of the chair. The monitor, keyboard, mouse, and speakers use mostly a plastic texture, but the screen is glossy. The books and chair are made of leather. I also printed the Substance Painter logo on the book, and the ASUS logo on the monitor using alphas.
Weapon
The weapon model was based on a reference image I found online, which I originally modeled in Maya. Most of the work was done in ZBrush since I was able to add many intricate details, shapes, and patterns to the base model. The weapon itself is a waraxe, with an angelic and bright theme to it.
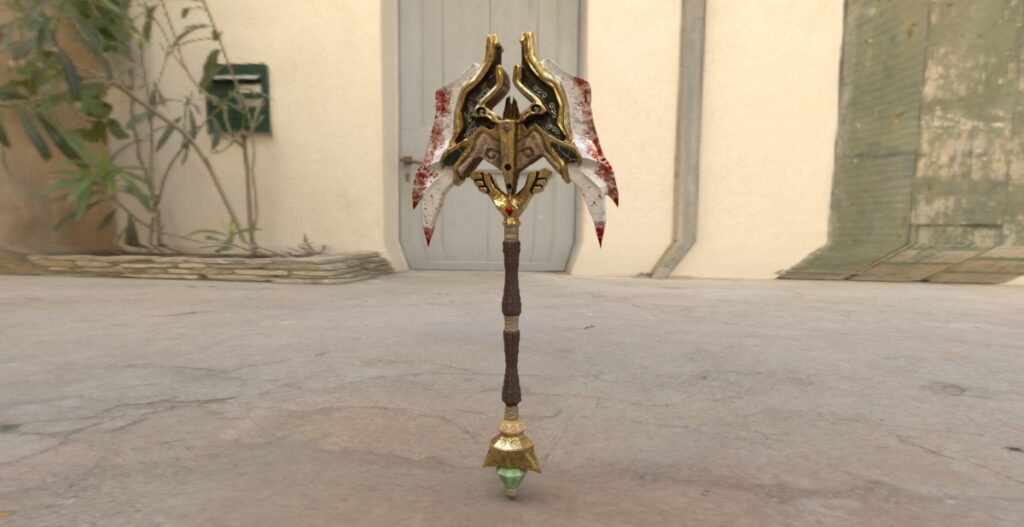
Overall, I am very satisfied with this result. The texturing process was quite enjoyable, and I loved experimenting with the different materials and smart materials to achieve this look. I started with a base of a dirty gold metal, and then painted white marble over the blades and black marble over the inside. The handle is a combination of leather and stone, while the bottom is jade, gold, and stone. Then, I added blood on the blades using an alpha.
Character
The character model took the lo ngest to create, but is definitely my favorite model so far. Like the others, it began as a Maya model, then was transferred to ZBrush, and finished in Substance Painter. I was the most creative with this model, using a variety of blend modes to achieve specific material combinations. The character is a human in a robot suit–you may notice that the face is the same face of the head model I showcased earlier.
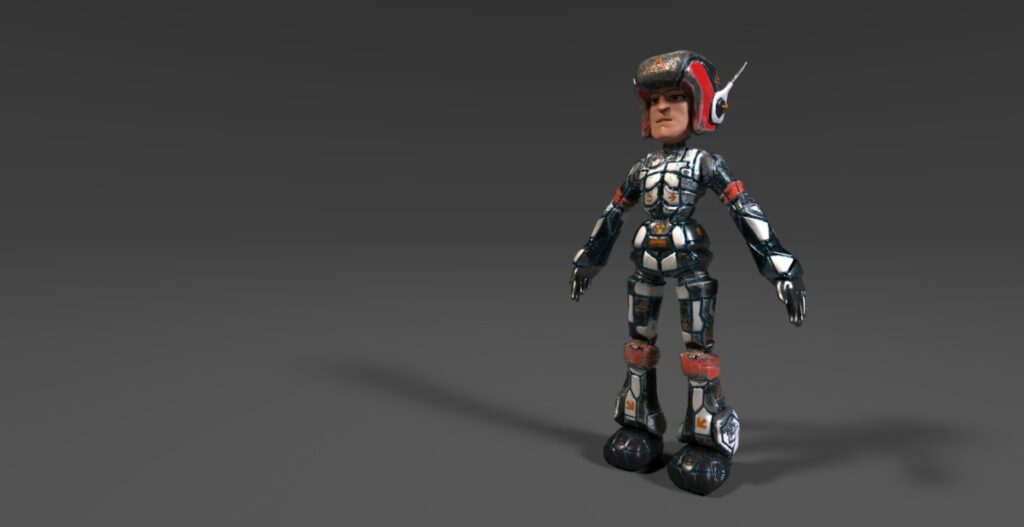
After many hours of trial and error, I can say that I am proud of the result. I tried to go for a mostly monochromatic scheme, but I ended up adding some orange highlights to make it more interesting. The metal textures are combinations of other multiple different metal textures, blended together to achieve a shiny but dirty look. I added blue in between the crevasses to make it seem like energy is flowing all throughout the body suit. The final step was adding warning signs and industrial symbols to complete the aesthetic.