WARNING
This page is currently a stub and is being worked on to improve and add related information.
Reflections Project Introduction
Our first unit in Senior year is the Reflections unit, where we answer to essential question of “Who am I”? All of our projects surround this question, from the personal mandalas, the “Why I [Write]” essay, and creating a 3D original character.
Overall, this was probably one of the more fun units so far. Because all the projects are deeply personal, the requirements for the details on how you create are pretty much up to interpretation, as long as it represents yourself in some way.
What is a Mandala?
In simple terms, a mandala is a circular pattern of repeating shapes and images that forms a sort of circular effect. The earliest form of a mandala started in around the 4th century and was produced in areas like China, India, and Japan. During this time, the Mandala also had a strong connection to Buddhism.
Back then, creating a mandala was a pretty delicate process.

- First, a cloth ladened with gelatin was stretched across a wooden frame, and white cloth and chalk was applied to create a smooth surface.
- Then, a sketch is done with charcoal to layout the different shapes.
- Afterwards, brushes lathered in mineral pigments, dyes, and a binder were applied onto the surface for outlining.
- Finally, the painter would use a knife to scrape the paint to create an even surface, and paint dust was removed with a rag.
Information referenced from https://asiasociety.org/exploring-mandala
Mandalas would continue on afterwards, expanding to many parts of the world.
Nowadays though, the process of creating a Mandala has simplified through tools such as Adobe Illustrator, and mandalas created today have expanded in subject to all aspects of someone’s personal life. There is also a heavier emphasis on the “repeating” aspect of a Mandala, with most Mandalas leaning into the “Kaleidoscope”-ness of the art form.
My Personal Mandalas
For our Personal Mandala project, we created two types: a black & white mandala and a colored mandala. Each Mandala was later either engraved into wood/plastic or printed. These mandalas would tell a story about ourselves, having references to different parts of our lives.
However, before we could even get started on the actual Mandala creation, we all used Adobe Illustrator to make templates with various repeating iterations. This template would take what we drew and automatically reflect it across the entire mandala. After making the template, we would each chose one to use for our actual Mandala. Mandalas that repeated less required more drawing, and Mandalas that had a higher iteration count made it easier to add more tiny details. In the end, I chose both the 8 and 16 iteration templates so I could have a mix of both sides.
Below are both versions of my Mandala, including the engraved/printed variations. To compare them, hover over the bar and slide it. You may need to resize your window if the images don’t appear properly.


BW Mandala Artist Statement (unfinished)
For our Reflections unit in Freestyle Academy, we were tasked to create a mandala. A mandala is a design that radiates out from the center point, creating perfect symmetry. When we are creating a mandala, we actually only work on a small slice of a circle, which then gets automatically flipped and rotated in Adobe Illustrator. Instead of just sticking to one slicing method, though, I decided to do both an 8-slice and 16-slice mandala. This way, I can add larger images more easily when I need to, and I can create a bit of variation between reflections. For our Mandala project, we used pressure-sensitive brushes, which, while a bit finicky to work with at first, were incredibly helpful to make the Mandalas. It’s very difficult to create curves with varied levels and stroke width without the digital brush. I still need a lot more practice using such tools, though, especially since it’s pretty new to me.
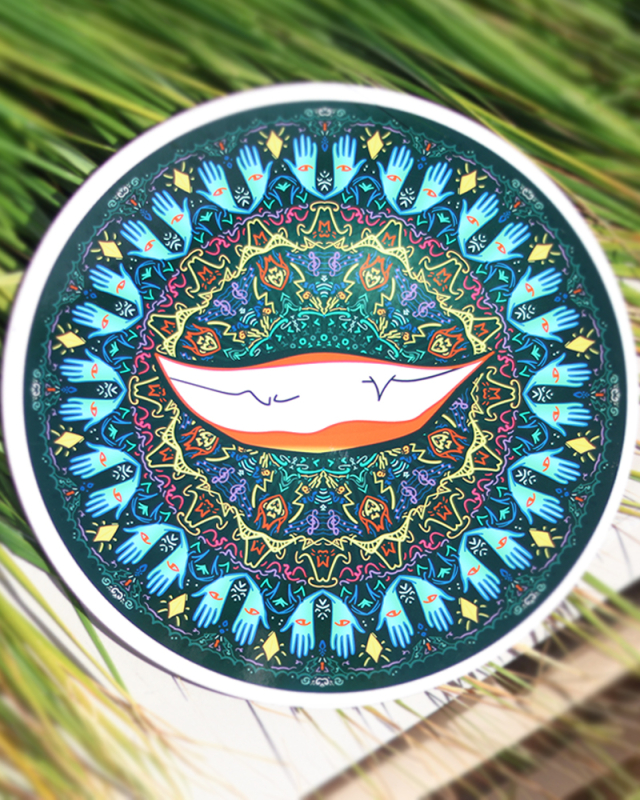
We created this mandala to answer the simple-sounding yet quite complex question, “Who am I?” When brainstorming about what to put in this mandala, I thought about my passions in life, and a few things popped into my mind. The first one was coding, and to represent it, I put a few 1s and 0s surrounding the very center of the mandala. Then, I wanted to represent music, since I am both a drummer and a choir singer, so I scattered some musical symbols throughout the midsection of the mandala. Another key “aspect” of myself is cats — I absolutely ADORE cats, and I knew that I needed to plop some in my Mandala. Afterwards, I added another symbol, being the hand with an eye in it. This symbol represents one of my favorite musical and video animation styles, being a combination of y2k glitchcore and psychedelic surrealism. For my centerpiece, I decided to add a Geometry Dash-inspired element from the level “Deprivation”, which uses similar symbolism to the hands.
In my opinion, the best part of the Mandala project is that with the right setup, it’s incredibly hard to make something that looks “bad”. In actuality, the hard part of the Mandala project is just how long it takes to make. It honestly gives me a lot of respect towards people who can make beautiful Mandalas in a pretty short amount of time. This entire process was incredibly fun, and I can’t wait to make more in the future!

Colored Mandala Artist Reflection (unfinished)
For our Part 3 assignment of the Mandala project, we were tasked to create a colored Mandala. A mandala is a design that radiates out from the center point, creating perfect symmetry. For this assignment, I took my BW Mandala and colored it using Adobe Illustrator. There were a few tricks I used to achieve this. The first was “Live Paint”, which is a tool in Illustrator that allows one to fill in gaps between outlines. However, Live Paint is pretty strict on the types of outlines that one can use. For example, my outlines were created using a pressure-sensitive brush, and converting these outlines to Live Paint caused them to lose all their “depth”. To work around this, I created a duplicate of my outlines directly on top of the original layer and converted the back layer to Live Paint.
When starting this assignment, I immediately knew that I would want a black background to match the aesthetic of the piece. Not only that, but the black background was useful for creating a contrast between lights and darks. I also chose colors that represented the element. For example, the 1s and 0s, which represented computer science, mostly used green, since coding is stereotypically related to “green text on a black background”. Plus, I wanted to create a small tribute to the Matrix, which is one of my favorite movies. For the musical notes, I intentionally chose purple, since these types of electives always felt “purple” to me, in the same way that some people find math to be red and English to be blue. My favorite color choice, however, was for the hands. Since the hands represent one of my favorite styles of psychedelic y2k glitchcore aesthetic, I wanted to make the color usage as jarring as possible. Hence, I made the hands a strong cyan-green color with a contrasting red eye in the center. When working on the BW Mandala with only black strokes, I found it pretty frustrating how limiting everything was. For example, the only way to make something appear “stronger” was to make the stroke width thicker. Conversely, using colored strokes, one can make something less apparent by just changing the color. Since my background is black, I can easily add a higher level of contrast between lines by making the important elements brighter and the other ones darker. However, in a sense, the black strokes were incredibly useful as a base for the colored strokes, because having to meticulously control the thickness of lines to make elements stand out from each other created more visual interest in the colored version.
This whole mandala-making process was a useful experience for self-reflection. There are a good number of aspects in my life that I can’t show much because of the limited amount of time I have. However, with this project, it felt like I could finally give a tribute to these aspects. This entire project was very fun, and I can’t wait to make more Mandalas in the future!
Mandala Videos
For our mandala project, we were tasked to create a “build process” video of the Mandala, showing each layer appear until the mandala is finished. This would also be our first “official” introduction to After Effects.
However, I honestly thought that for my mandala in particular, such build video would be kind of… boring. Of course, I did needed a proper build video to show how the mandala was made, but I also wanted to make a video that better represented the “vibe” of my art piece.
Thusly, after weeks of work, I made an effect-style video with inspirations from Geometry Dash and the glitchcore style. I honestly think it turned out pretty well! It may not really follow the general rule of how mandalas are supposed to be presented as a sort of relaxing activity, but rules are meant to be broken, and one can only really make something creatively my own by going further than what’s intended.