The Animation Narrative 2 Unit consisted of more 3D Maya modeling—but including animations, instead of just rendered objects.
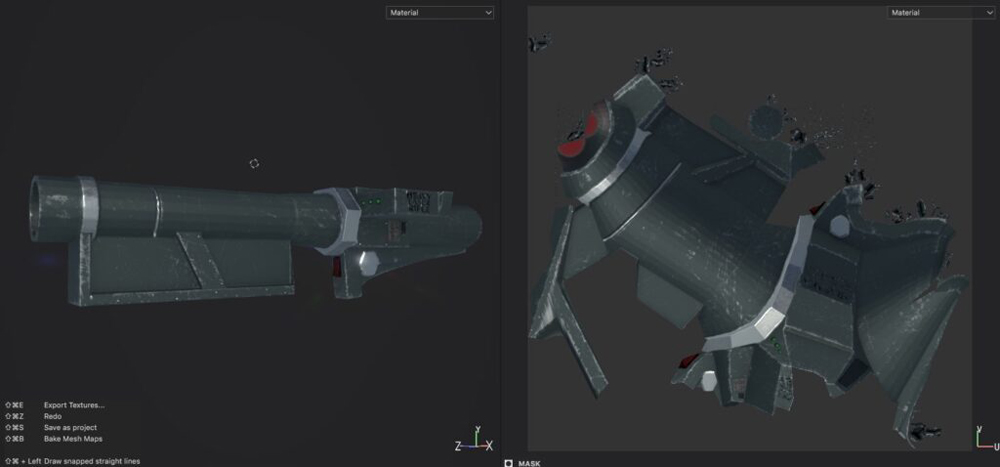
Weapon Design, Modeling, and Renders
The weapon modeling project started in Maya: creating the base design with simple polygons. I chose to match my character and weapon in a preemptive attempt to make some cool animations later on. As my character was Shotaro Kaneda from the 1988 film of the same name, I chose to make the weapon he used in the film—the Arasaka HLR-12X Heavy Laser Rifle.

After modeling the weapon in Maya, it was time to continue in ZBrush. In Zbrush I continued to work on modeling the weapon, making sure the object would render correctly—see below why I had to work on that.

Finally, the laser rifle was moved into Substance Painter, in which I could give this “bunch of polygons” an actual texture, and make it look like a real object.

Artist’s Statement
We knew ahead of time that the 3D Weapon modeling assignment would eventually be tied into our 3D Character modeling and animation, so I chose as a theme for the two the 1988 animated film Akira. The main character of the film was going to be my character as well, so I chose a laser rifle he used in the movie as my weapon of choice.
3D Character Poses/Bio
This project was short and self-explanatory. We took our finished character, and gave them a short bibliography.

3D Character Animation—Walk, Run, & Jump
Finally! We were moving on to animating our character. The process was not easy—taking your finished object (an OBJ file) came without the beautiful textures and colors we made in Substance Painter—we had to make a brush that used the Substance Painter file as its “paint”, and apply it to our OBJ to create our character. In this way, the “skin” or paint can stretch as the character moves.

Pardon the lighting and reflectivity of my character in the animations below—we’re only just learning how to render. Same with the actual animation itself—we’re practically animating frame by frame, and at 24 frames per second, that’s a lot of frames to make tiny adjustments to your character’s position for.
3D Character Animation—Lip Sync
I decided to “stay in character” for this one—using Kaneda’s lines. Here are the lines in Japanese, Romanized, and in English.
Tetsuo:
Japanese: どこ にでも出てきて ボス面し や が る。
Romaji: dokonidemo detekite bosuzura shiyagaru.
English: You always show up and boss me around.
Kandea:
Japanese: おめえもボスになったんだろ?この瓦礫の山でよ。
Romaji: omē mo bosu ni natta ndaro? kono gareki no yama de yo.
English: You’ve become a boss too, right? … on this pile of rubble.
Tetsuo:
Japanese: 金田一 !
Romaji: Kaneda!
English: Kaneda!

The cool thing about 3D animation is that you can combine the stills above with a moving character—so he can talk (using the expressions above) while you have the character also performing an action.
As for the video below, please excuse the audio: I had a janky audio recording setup of recording my computer playing the original movie, while my mom was cutting some vegetables.
3D Character: Motion Capture
The motion capture utilized our original model, but someone else’s “motion capture”. In short, a motion capture, or Mocap, is a pre-made animation created for a set of joints. If you assign the same joints to your model, this pre-made animation will act on those joints, moving YOUR character. In fact, I used a mocap file in my Lip Sync, and modified it to include mouth movement! The first time I made the Motion Capture Animation, I sent in an mp4 file to be uploaded to YouTube, but included copyrighted music, so I had to redo it.
3D Character: Action-Reaction Animation
The action-reaction animation took our previous work and brought it all together: we would use our knowledge of animating our character to create a ~30 second animation which, as its name suggests, showed an action and a reaction—for example, throwing a stone that bounces back and hits the character, or animating jumping from one roof to another (these are both pulled from actual animations other students made for this assignment). I chose once more to incorporate the action reaction animation into my “story”—fitting it into the Akira theme. At this point, Kaneda is talking to the main antagonist: his childhood friend Tetsuo, who always felt overshadowed by our protagonist friend.
Action Reaction: Animating
For each “scene”, or different shot with different animations, a different Maya file had to be created. I chose to have two scenes: one with Shotaro walking into the scene, and one with him firing the Arasaka.


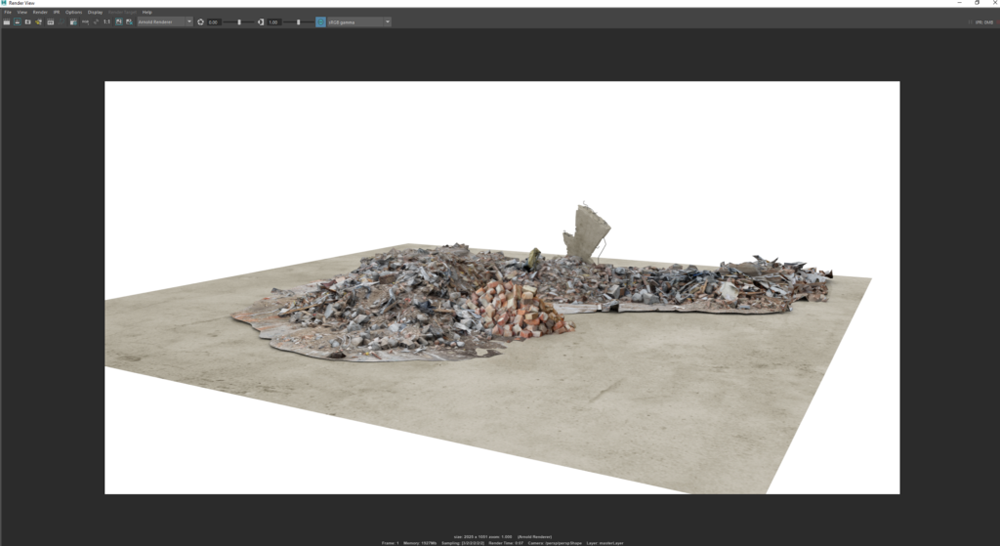
Action-Reaction: Environment
The second step to finalizing my animation was to create a background for those animations to take place in: in the actual Akira film, that environment is a junkyard, which I tried to replicate here.
Action-Reaction: Rendering out the Final Animation
After adding the environment to each scene, I had to render them out. I chose to render them out under 540p quality (pretty low), because I wanted them to render “quickly”—an 8 and 10 hour process. It took so long because I messed up the framerate—to make a long story short, I thought I had to render out at 1500 frames per second, not 24. In short, the rendering time took 60 times longer than it should have—that’s right, from a combined 18 HOURS down to 18 MINUTES. In that case, I could have rendered out at 1080p, extending the render time, but leaving myself still with much less than 18 hours of waiting. As a matter of fact, my HOURS of rendering actually failed, with a small mess-up in both scenes (due to me pausing the render halfway through and having to re-render the second part out, but in a different angle). So after 20 hours and three days of working late, I finally realized my mistake and re-rendered everything at 24 frames per second. At 540p. I forgot to increase the quality, and frankly I was so tired after coming in every day to work late that I forgive myself for that slip. I was finally able to compile everything, but the end product isn’t tip-top—after coming in late for a week straight, I was truly burnt-out working on this project, and finishing it at all seemed like a miracle at the time.
Reflection
The Action-Reaction projects were some of the hardest animation projects I’ve ever done—which makes sense, really. A project utilizing the culmination of our previous knowledge with new and more extensive animations generally does that. They were my favorite, however—my actual favorite part was the process of creating my character and weapon: coming up with the genius idea of combining the two projects, drawing out my weapon and character, creating them in Maya and exporting them to Zbrush for some extra work, creating the final look in Substance Painter, and the sweet, sweet, 4k renders with the settings turned alllll the way up (these go to 11!)….good times indeed.