Introduction
“How can I use unconventional forms to express myself?”
For the Conceptual Project we learned how to use very popular softwares and equipment used in many job industries today. We were able to apply our own perspectives and opinions to communicate our creative visions whilst improving our technical communication skills at the same time.
In Freestyle English and Digital Media, I valued being able to learn how to learn and to be able to do it at my own pace. I also valued the access to so much tech and being able to have it presented to me in such a way that isn’t overwhelming or intimidating.
Haiku
In English, we learned about the wonderful art of Haiku. We studied many famous Haikus translated from their original Japanese versions and then we were tasked with writing our own Haiku based on a randomly selected concept statement which included an emotion and an experience (mine is captioned under the embedded youtube link to my Haiku video!) We were challenged to use all the elements we studied and pair a meaningful photo with it. Then we brought our Photo Haiku to Digital Media and edited a short video of us reading our poem with our own artistic inflections and added music and text animation.
In producing this Haiku Video, I valued being able to get more comfortable using Premiere Pro which is especially important for my elective class, film. Overall, I enjoyed it as one of our first projects because we were able to bring our haiku to life and have others experience it more accurately to what we intended.
Poetry
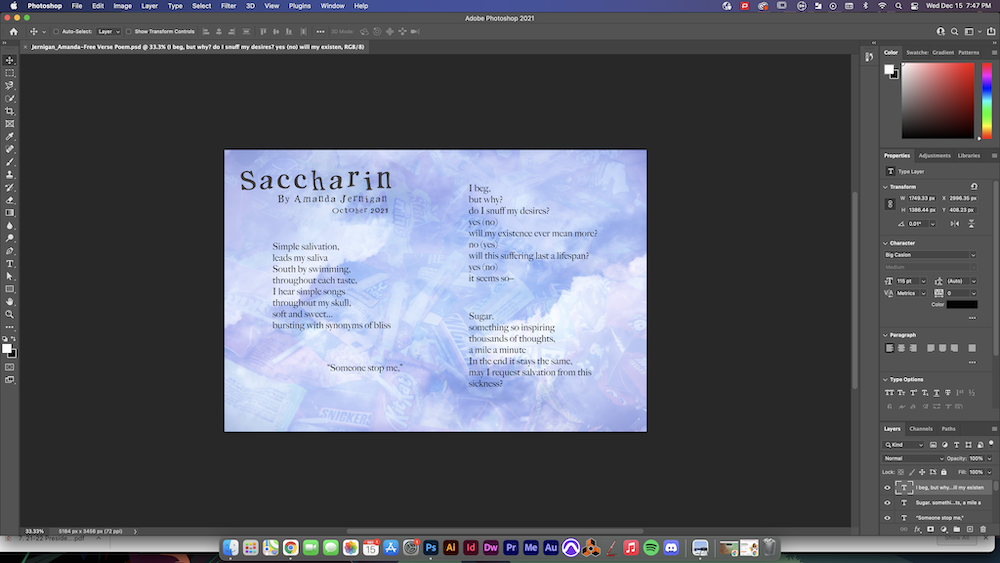
In English for this unit we were taught about many different forms of poetry and poetic techniques to incorporate into our practice poems. Then, for our free verse poem final project we were able to create a new free verse poem or revise one of our practice poems from the unit. I chose to revise my sound poem so I built it up to make it more meaningful to me. Then, in Digital Media we were challenged to use Photoshop to edit a photo to fit the meaning of our photo and to use ProTools to edit the audio recording of us reading it and our intention statement.
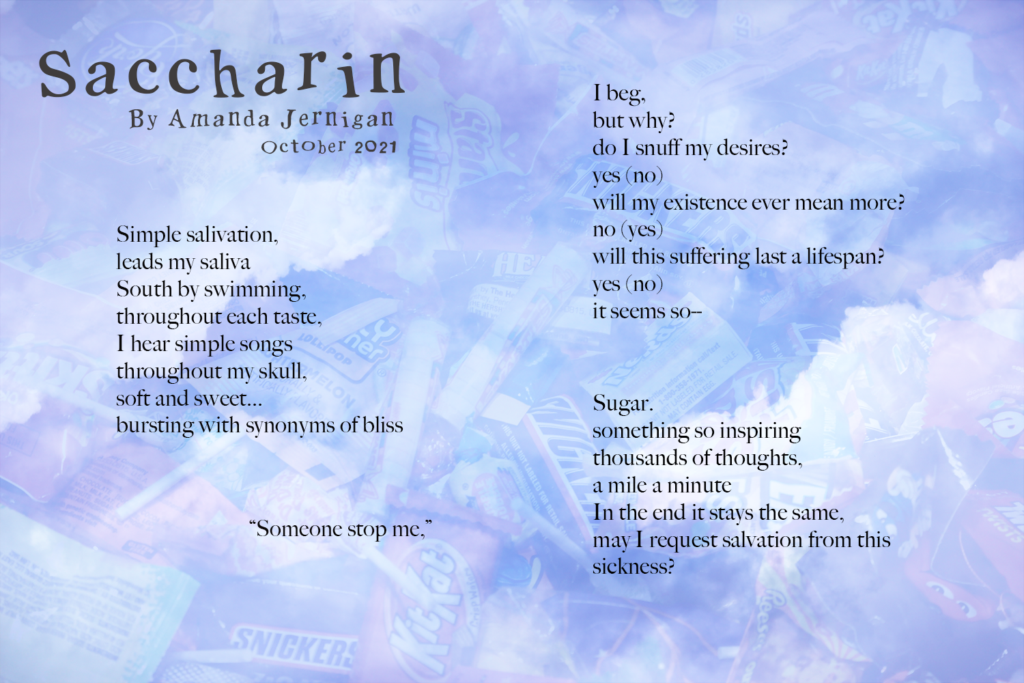
“Saccharin” is a free verse poem about my personal struggles with disordered eating. I started this poem by using my sound poem and expanding it. The speaker in this poem is a person who is trying to enjoy Starburst candy, but then finds themselves feeling guilty about eating sugary treats because of how they’ve been taught that they are unhealthy and they shouldn’t eat them. Many thoughts are running through the speaker’s mind as they ponder if their life will ever mean more than a collection of thoughts about whether or not they should or shouldn’t eat something. In the first stanza, I use alternating end-stops and enjambment to give the beginning a nice cadence with small pauses, created by the use of commas, to represent the calm enjoyment of the Starbursts before the chaotic thoughts come in later on in the poem. I use an ellipsis after the phrase “soft and sweet” to act as a natural decrescendo so the volume actually becomes softer and trails off as it is being said. It also creates a bigger contrast between the next line where we have this “burst” of energy which represents the release of dopamine that comes from consuming sugar. Then, once the energy quickly disperses, they are left with regret and this makes the speaker indulge more because they want more dopamine to make themself feel better, and in the next line the speaker is begging for someone to stop them because of how addictive this cycle has become. This line is lineated differently from the rest of the poem because it’s when the speaker is calling out to the reader and asking for help. This is when the speaker’s attitude toward the consuming of this candy shifts from playful and joyful to detached and despairing. In the second stanza I have a similar alternation of end-stops and enjambment and I intentionally leave the last line “it seems so” enjambed to represent the continuing of these intrusive thoughts into the foreseeable future. Throughout my entire poem I use the poetic sound technique of consonance with the ‘s’ sound to mimic the salivating that occurs when you eat sweets. Ultimately, the lineation patterns and consonance in this poem shows the experience of the speaker while they are in a battle with themself. During peer review, my readers enjoyed the second stanza where the speaker’s thoughts are conflicting, shown by the yes’s and no’s, but suggested that I make my punctuation more intentional. The most helpful feedback I received focused on my first stanza and how the imagery was conflicting. I adjusted the types of verbs I was using and thought of it like a narrative and imagined a specific situation in order to improve the clarity. I was particularly inspired by Harry Baker’s “Paper People” because of the very satisfying repetition of the “p” sound. I tried to emulate this in my poem by repeating the ‘s’ sound as much as I could to give it that same satisfaction.
Doing this project, which consisted of producing my poetry in different medias, I valued the experience of bringing it all together after doing all the parts separately and over a long period of time. This is valuable because being an artist means that we might not always get results right away and some projects take time so it’s nice to get used to this process earlier rather than later.
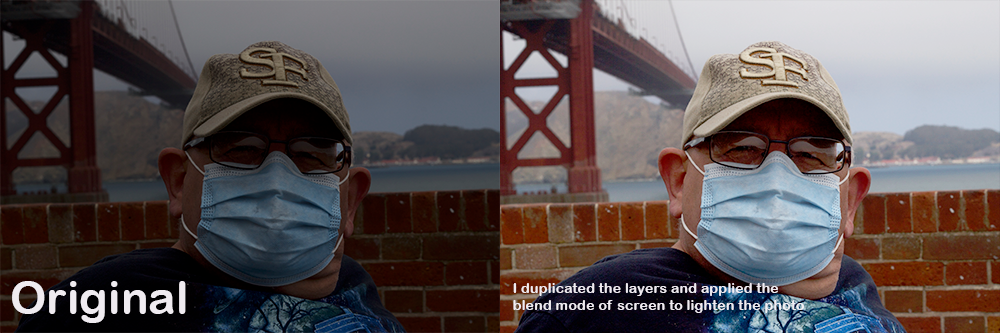
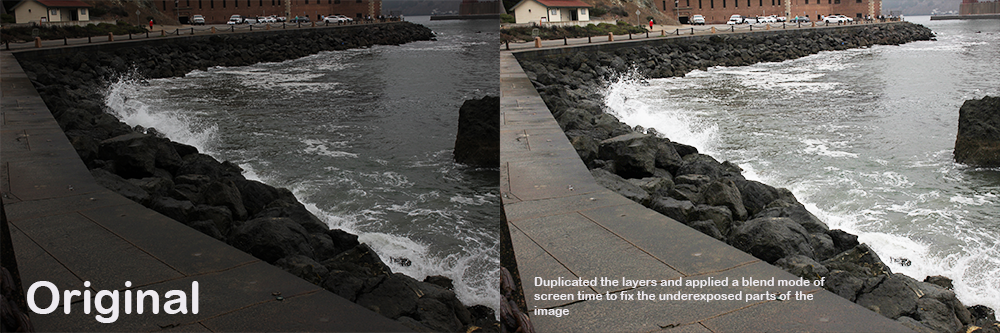
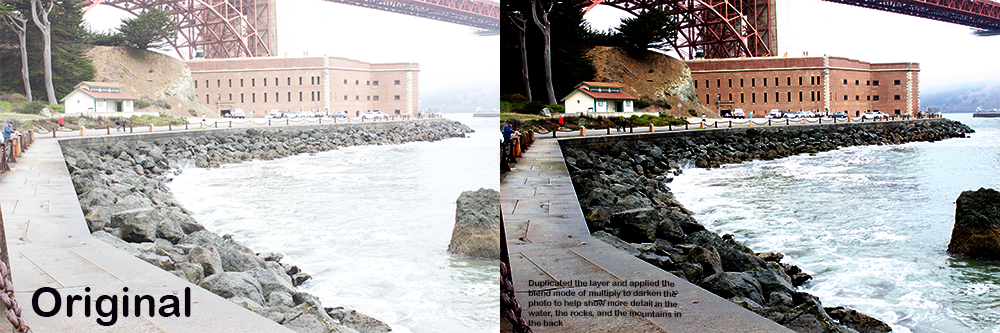
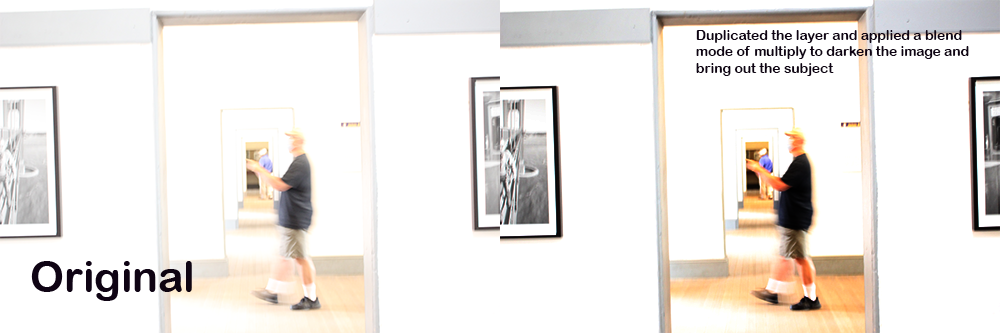
Photoshop Blend Mode Editing
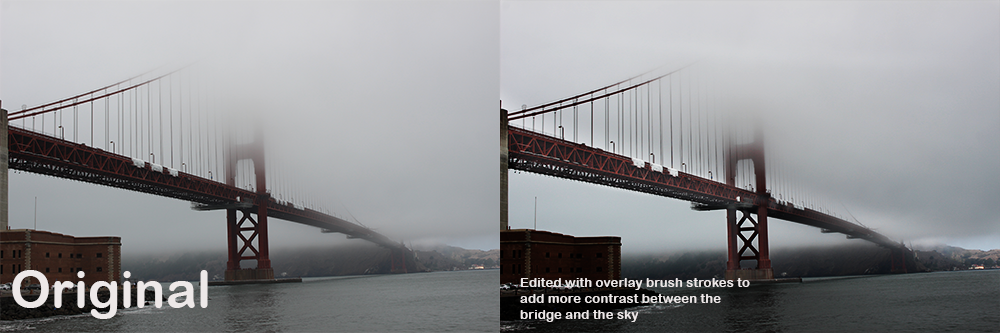
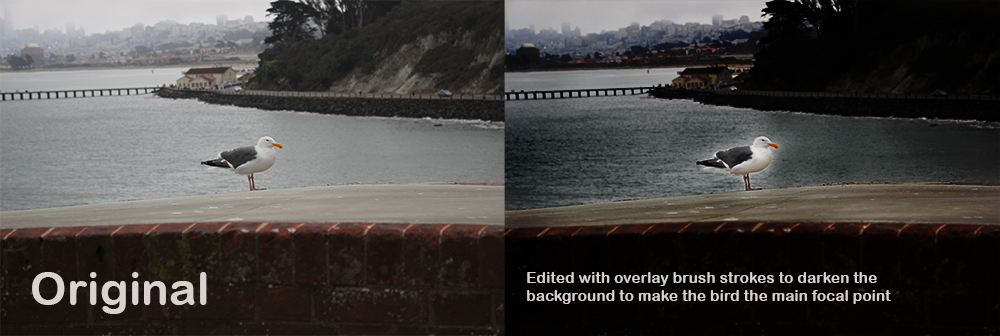
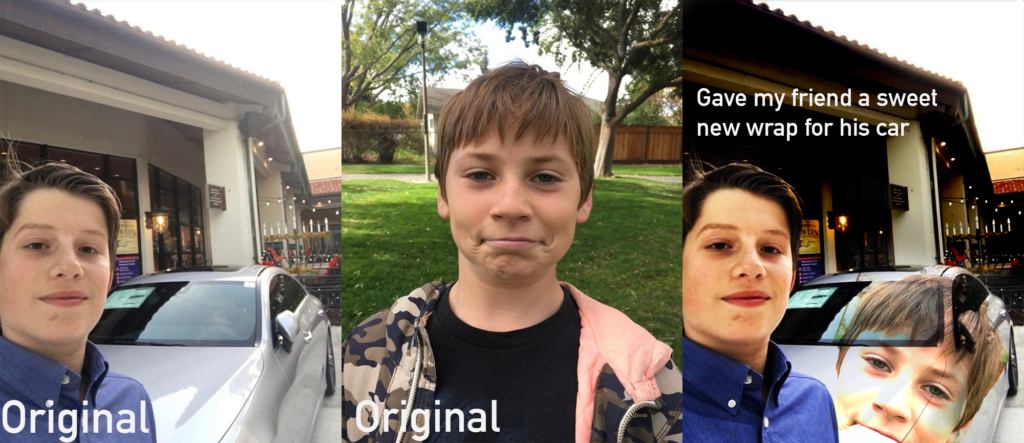
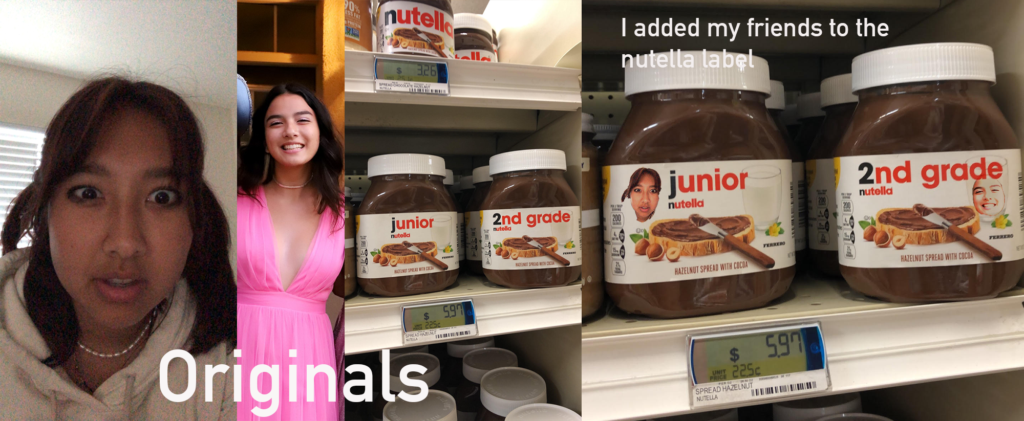
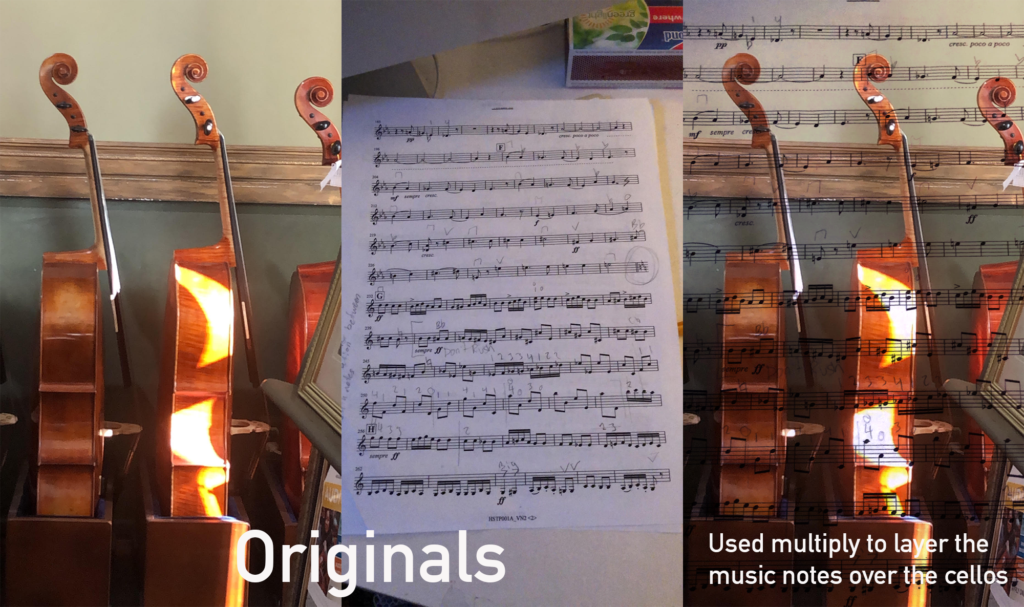
For the Photoshop Blend Modes assignment we learned how to improve our Photoshop skills. Over the course of a couple weeks we learned how to edit our own photography with Photoshop Blend Modes, such as: multiply, screen, and overlay. Multiply allows us to darken our images, conversely, screen allows us to lighten our images, and using the brush tool with the overlay blend mode we are able to lighten some parts of the image and darken other parts. We also learned to blend multiple photos together.
What are your thoughts about using Photoshop Blend Modes?
I thought using Photoshop Blend Modes was a little difficult to understand at first, but then, once I got some practice in, it became easier and made more sense.
What did you value about learning Photoshop Blend Modes?
I valued being able to be independent and have the freedom to make mistakes and being able to teach myself not to make those mistakes again.
Film
For the Conceptual Project in Film, we learned many basic elements of film and basics of editing on Premiere Pro. First, we learned some history about film so “we can know where we’re coming from, in order to know where we’re going,” as Mr. Taylor says. Then we learned about basic film language and different types of shots – such as a two shot, long shot, close up, zolly, dollying in and out, etc. Along with that we learned some cool effects on Premiere Pro, such as using a green screen, and the double effect. The first big project we worked on was an experimental film based on our concept statement given to us in our English class. Mr. Taylor wanted this as our first big assignment before we learned about anything else so we could open our minds to think extremely creatively and practice conveying emotions through our shots before we learned all the rules that come with narrative filmmaking, our next unit. So far, I am really enjoying film and valuing the environment in the classroom, the interesting lessons, and the independence and freedom to figure stuff out on our own.
Original Experimental Film Synopsis
I wrote this synopsis before the production of my experimental film to convey the general sense of what would be on screen:
Concept Statement: I am exploring the feeling of shock through serving the community.
My experimental film will begin with nature. Rocks, sand, leaves, plants will all move towards each other, as if gravity is pulling them towards each other. They start coming together slowly and then start to gain speed, since the attraction would be stronger since they’re getting closer to each other. During this segment, we hear thunder rumbling, getting louder and louder. At the same time, a plate is falling and then breaking in slow motion. The shots are going back and forth between these two scenarios.
Suddenly, there is black and then an oven timer dings and someone pulls a cake out of the oven, fully baked and decorated. It’s a cartoony-looking cake made from construction paper. The person tries to pull it out with their bare hands and the heat hurts them and they drop the cake, but before it lands on the ground, we cut back to the plate breaking, this time it is breaking in reverse, so it looks like it is coming together. Then we cut to a bolt of lightning with no sound and the lightning bolt lines up with the line between the broken pieces of a plate right before it comes back together in the previous shot. Then in the next scene is the cake on fire and then that’s when we hear the thunder that comes after the lightning.
After this, we arrive at a faceless person receiving an award with the audio of people clapping. Assuming he is in front of a crowd, we then switch to his POV and we see there is no one, but the sound of the accolades linger on. Then we cut to the cutting of the previous cartoon cake and the faceless person hands out single slices to the viewer on plates. However, when we cut to the POV of looking at each slice (the POV of us, the viewer) we see something different, either something beautiful or grotesque. If it is grotesque the viewer pushes it to the ground, but if it is beautiful the viewer accepts the slice. However, the opposite will also occur where the viewer rejects a beautiful slice and they accept a grotesque slice. On the final slice, the viewer rejects the slice and throws it down to the ground and the plate it was on breaks, and it is the same broken plate from before except it breaks in real time, not in slow motion. Then we slowly fade to black and the concept statement appears.
My concept statement from English was “I am exploring the feeling of shock through serving the community” so to encapsulate shock I chose to use shocking visuals such as a plate dropping, lightning striking, and fire along with the surprising audio of the plate shattering and the thunderclap from the lightning. To show “serving the community” I took it literally and made the character in my film serve the viewer slices of cake. Filming this took a lot of prop making and prop destruction which I really enjoyed and the overall production forced me to become super organized to make sure I filmed and edited it to the best of my ability in time to meet the deadline.
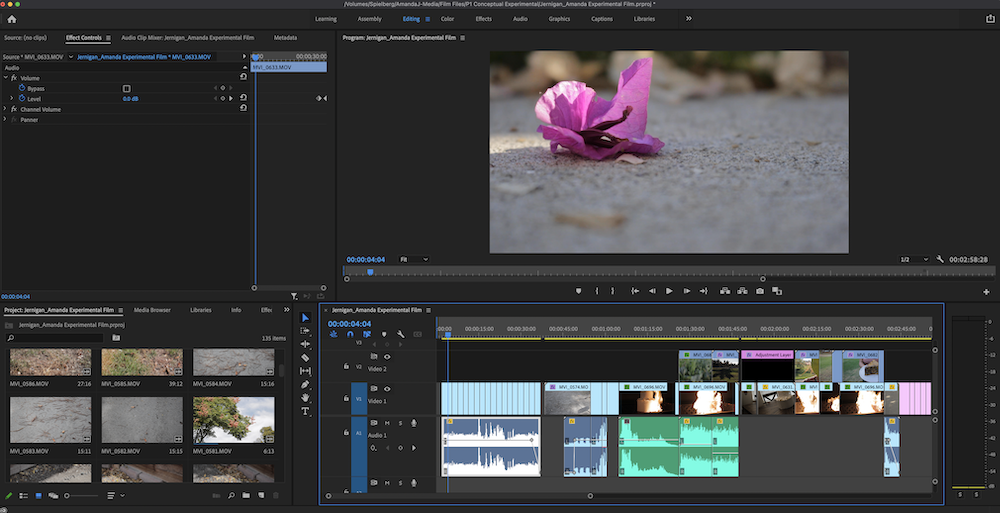
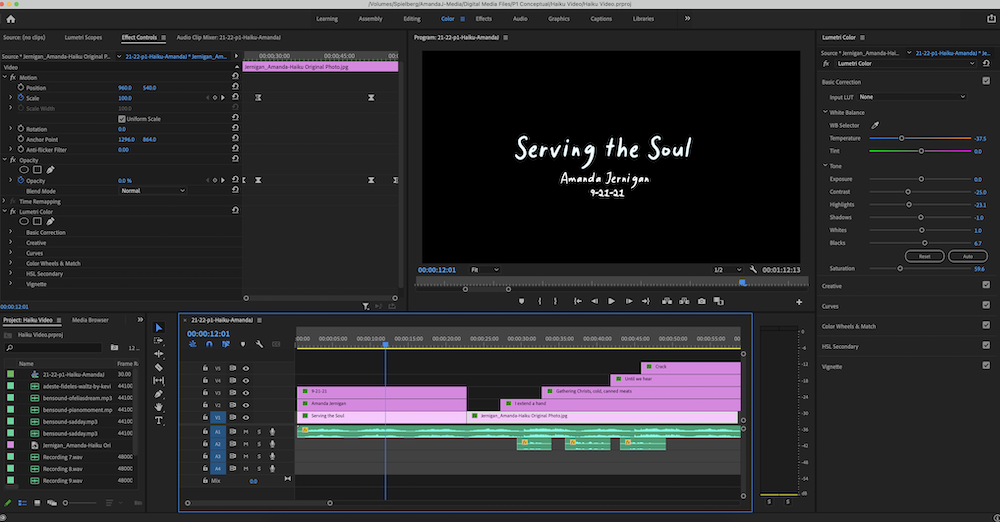
Above is what I was viewing as I edited my film. The rectangular box on the bottom right is the timeline, where the sequence of our entire movie is displayed and is where we splice everything together and are able to see everything displayed in succession. The box on the top right is the program monitor which is where we are able to see what the film will look like to the audience. The top left box is the source monitor, where we can pull up clips from the bin (bottom left box) and chose what parts we want and move those parts into the timeline, it is also where we can adjust the controls of effects such as the volume and text.