Introduction
“How can I use unconventional forms to express myself?”
The Conceptual Project invited us to engage in creative liberties with writing, video-making, photography, and music. Like the name suggests, we were urged to think beyond the concepts we were presented with and experiment during the process of each project. Whether it was playing around with the reverb of our parody song for Digital Media, or juxtaposing random objects for our photography assignment in Design, this unit taught me the importance of not being afraid to simply try. Not only was I able to lean into my artistry but I also learned skills in Adobe Photoshop, Audition, and Premiere Pro, and how to use DSLR Cameras, Tascam Audio Recorders and WordPress.
Early on in our first quarter, one of the first assignments we were given in English and Digital Media was to create a video to capture our interpretation of a piece of artwork from the SF MoMA, which we visited for a field trip. The goal was to find a piece of artwork which stood out to us, take notes on it, then write a voiceover text which we would use to make a video in Digital Media. When I found an artwork which I was curious about, I focused on why I was drawn to that particular piece — not just because of how it looked, but the awe-inspiring quality of it which made me feel emotionally connected to it. I was excited to write my voice-over text for this assignment so I could share my experience with others. Also, I was excited to learn how to make a video for the first time! This project was one of many which provided me the opportunity to combine critical thinking and writing skills with modern technology to create a product I could be proud of working on and share with others.
Art Reflection
The SF MoMA Art Reflection Video was an exciting but simultaneously daunting project for me. I absolutely love going to museums and enjoy the quiet spaces they provide to observe artwork. After writing the voiceover text and implementing feedback from my English teacher, Mr.Greco, I was able to refine my words to a brief narration. However using Adobe Premiere Pro was difficult for me because I initially struggled with the concept of keyframing and navigating the software. But in the end, I learned how to make a video and was able to have fun adding music and effects to my project to showcase the immersive experience I had in the museum that day.

Although there were definite moments of frustration where I struggled using Premiere Pro and making sure my voiceover text was engaging but short, this project taught me how to analyze art and share my experience. The process of taking notes about the artwork, writing about it, and then creating a visual media product is something I had never done before. This new experience taught me how to embrace mistakes while working with unfamiliar tools while also expressing my authentic thoughts in the creative work I do and make.
Parody Introduction
▶ Doomscrolling
⏸ Doomscrolling

For the Parody Song, we had to choose a song we liked and rewrite the lyrics to be obscure and funny. In fact, we were explicitly told to not sing well to further emphasize the oddity of this project. Throughout this process I enjoyed learning how to edit audio and have fun rewriting the lyrics to one of my favorite songs.
For my parody song, I chose to write lyrics about “doomscrolling” and use the song Zombie, by the Cranberries, as the music. Many teens (and adults) today can relate to the feeling of scrolling on our phones for hours on end, often leaving us feeling mentally drained and blank. I frequently see people of all ages staring at their phones while walking down the hallway, waiting in line, and even during family dinners in restaurants. But, I’ve realized that spending most of our time on screens is taking away our ability to experience moments authentically with full presence and attention. Because of this, I was inspired to write a call to action to address how much we overuse our screens similar to the political expression used in Zombie, which was written as a protest against the violence and conflict in Northern Ireland during the 90s. I’m quite happy with how my lyrics and voice sounded during the recording and I enjoyed improving my editing and not being afraid to sing terribly!
First, I downloaded the karaoke version of my song so I could save it before editing. Next, I had to write my lyrics. I found it very helpful to listen to the original song simultaneously while writing, which made it easier to select words that matched the syllables of the original lines. After I finished drafting my lyrics, I created an Adobe Audition session to prepare for the recording process. For recording, I got to use the IsoBooth for the first time which was super exciting! I learned how to manipulate input volume, use the microphone, and save my recording with Audition. I was pretty happy with my first take so I just left it at that. Then, I edited my voice by normalizing the volume, using the de-esser tool, adding reverb and delay to change the sound depth, and I also changed the pitch of my voice to be very high and low in some parts. Finally, I made some manual fade adjustments to the music in the background. I feel that I should have focused more on increasing my input level when recording to make it less quiet, but overall I’m happy I learned a new skill of audio editing!
Parody Lyrics
Another day spent scrolling,
My face glued to the phone
And the time just seems to go by
Yet the days seem slow
But you see,
It’s not just me
It’s all those families
In restaurants at tables they are scrolling
With their phones and their ipads
And their ipads and their screens
On their phones on their phones they are scrolling
On their phones, on their phones,
Doomscrolling, doomscrolling, doomscrolling,
What’s in their hands, in their hands,
doomscrolling ,doomscrolling, doomscrolling.
Doo doo doo doo
Doo doo doo doo
Another person walking
Head bent down all the way
And it’s not just one but so many
Are we entering a screen plague?
It’s not just teens
its kids from 2016
In restaurants at tables they are scrolling
With their phones and their ipads
And their ipads and their screens
On their phones on their phones they are scrolling
On their phones, on their phones,
Doomscrolling, doomscrolling, doomscrolling,
What’s in their hands, in their hands,
doomscrolling,doomscrolling, doomscrolling.
Oh-oh-oh-oh -oh-oh-oh -eh-eh-oh ya-ya


Photoshop Blend Modes
For the Photoshop Blend Modes assignment in Digital Media, we learned how to edit individual layers of photographs, quite literally blending different elements together. We had to start with original photographs and then edit the colors and lighting of each of them and place the original and edited side by side to observe the differences.
I valued learning about and creatively using Photoshop Blend Modes because it is a relatively simple way to edit photos to make them better. It is a fairly straightforward process, and even the most subtle changes can improve lighting and color. I really liked learning how to creatively blend two photos together. Furthermore, I see myself using these new Photoshop skills as a way to improve my photos for Design, and also for my school’s newspaper, the Oracle. Sometimes when photos don’t look that great, it is important to understand how to enhance them and Blend Modes is a great way of doing so.


DSLR Photos
In the early weeks of Digital Media, we learned how to use DSLR cameras and how to change settings like white balance, ISO, and shutter speed. We were also taught how to use light wands and flash attachments to use different sources of light in photographs. During one class period, we were able to take photos of our peers and objects with different backdrops inside and outside the classroom which demonstrated the versatility of the camera to me. Although I have used DSLR cameras in the past, I was unaware of how many things one can change and experiment with them to produce interesting photographs. I particularly had to get used to remembering how the different settings affect each of the different parts of the photograph in Manual Mode (to be quite frank prior to this project I had only really used Av mode when I took photos with a camera.) But once I understood how changing shutter speed can capture movement in different ways, aperture can control depth of field, and ISO is key to light, I was able to see how all these different parts of the camera are a unit which work together to take a photograph. I now know how to take photos during the day and night while managing exposure, aperture, and shutter speed to take photographs wherever I want to.


Design
During the Conceptual Unit in Design, we were introduced to the elements of art, principles of design, and learned how to use Adobe Photoshop. Along with these technical and foundational skills of art, we were encouraged to push the boundaries of creativity, especially with the Nature Name photography assignment and our Conceptual Photos. So far, Design has taught me to value the different parts of the whole as much as the “whole” itself. What I mean to say is that I’ve learned to pay attention to every detail in photographs, posters, and even the nature around me to see how they all work together to form art.
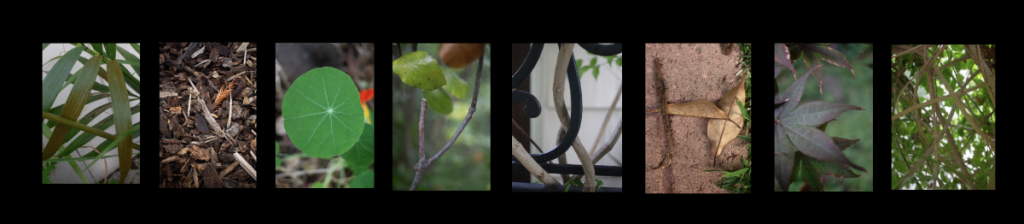
Alpha Name Photography
This assignment was one of my favorite assignments during the semester. We were tasked with finding objects in nature (they could not be man-made) which looked like letters which we could use to spell out our first name. My name is eight letters, so it was a somewhat tedious process. (Have you ever seen an “H” just lying around in nature?) Regardless, I loved taking my camera out early in the morning and walking around my backyard to find different leaves, flowers, and vines that looked like letters. The process taught me to be more mindful and attentive to the world around me and stretch my imagination to reject the traditional way we think letters are supposed to look. I then uploaded these photos into Adobe Photoshop and changed the coloring and lighting of each of theme to make each object stand out and eventually “spell” my name out.
Conceptual Photo
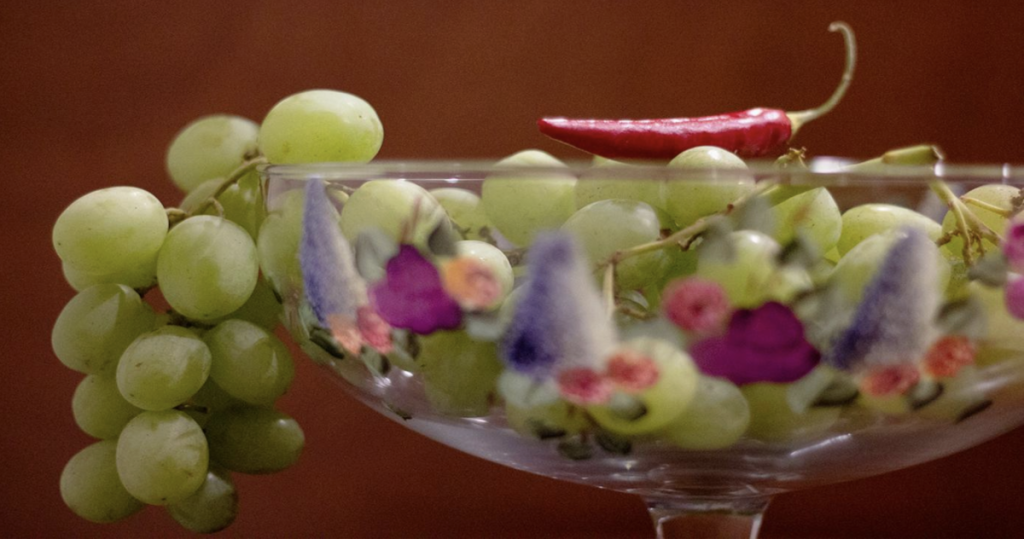
The Conceptual Photo assignment was one of the most abstract projects I have ever done. We randomly chose an obscure sentence which related an emotion to an action, which often never related to one another, and then we had to use objects to represent this scenario without it being literal. Essentially it is representing a concept without it being so obvious that the viewer can understand it immediately. After many crumpled up sketches of my setup and crossed out object ideas on my planning doc, I settled on a practical choice for my photo, but one that I think represents my sentence in a unique way.
My concept: I am experiencing the feeling of rage through being welcomed into a new community.
For my two objects, I decided to use a red chili to demonstrate rage and green grapes to demonstrate community. The chili symbolizes spice and anger because of its bright red color and powerful flavor, which demonstrates the all-consuming characteristics of rage. On the other hand, the grapes symbolize community because they are individual pieces which hang on the same vine, demonstrating the unity in community. I wanted to create a story that shows how the chili is angry and rageful because it is joining the new “community of grapes.” In Design, we studied color theory and learned about complementary colors which is why I chose red and green, because they create a bold contrast which pops out to the eye. Additionally, I chose a fruit bowl with classic designs because I wanted to mimic the style of still-life fruit paintings. For lighting, I chose to use a warm yellow to complement the reddish tones of the background and create a pleasant glow on top of the fruit and chili. Throughout the photoshoot, I had to experiment many times with the position of the fruit bowl in order to compose a scene which not only seemed balanced, but also to emphasize the chili placed on top. I really enjoyed rearranging the grapes to create interesting movements in the bowl and also trying different angles to take the photo. (I had to squat and kneel a lot!)
Prior to this assignment, I had some experience with Adobe Photoshop and using the different tools it has, such as lighting, saturation, and cropping adjustments. However, the Conceptual Photo assignment allowed me to further develop my skills by experimenting with different combinations of the tools to enhance my photo. I primarily used the saturation tool to deepen the colors of the objects and the curve tool to modify the lighting to decrease shadows and control the positions of light on the subject. Throughout the editing process, I learned that subtlety is key when it comes to using Photoshop, and I hope to continue applying these skills to create other nuanced photos.