Conceptual
The conceptual project is freestyles first project for the students. It emphasizes taking risks with self expression using mediums like poetry, art, and web production creatively. In this project, students are encouraged to express our opinions and feelings in a personal way through art. In order to develop their own communication skills, students learn about many different professional equipment and applications like Adobe Photoshop, Adobe Premiere Pro, DSLR Cameras, Tascam Audio Recorders, Avid Pro Tools, and WordPress.
In my first semester as a Freestyle student, I was exposed to many new different forms of art and creative outlets that I have never seen before. Through the three classes I took at Freestyle, I was able familiarized myself with these new creative applications and equipment. Although I would consider myself a skilled artist, it took a lot of time and effort for me to adjust to the new forms and mediums of art. In Design, I got to experiment with photography for the first time. The class learned different photo techniques using the DSLR Cameras and used them to take conceptual photos that express a certain feeling. We learned important design principles like color, form, and space to better understand what it means to have a good design. We used applications like Adobe Photoshop and Adobe Illustrator and learned how to use the many different tools that were offered. In English, I explored different conceptual poetries and narratives that we analyzed and discussed in class. What I liked most about this class was the class discussions we had about the novel “1984”, where we were able to dive deeper into the complex themes and messages expressed in the novel. we also got to implement the communication and expressive skills we learned in class into our own poems, haikus, and short narratives. In Digital Media, I learned how to use professional applications and equipment that I was unfamiliar with. We learned how to create websites (like this one) with WordPress. Pro Tools was the hardest application to learn about because I have never used any audio editing softwares before. However, I was able to learn the basics of Pro Tools through projects like Poem Recordings and Parody Songs. We also used a video editing software called Premier Pro to better showcase the poems we wrote in English. I felt that I learned the most in this class with the use of modern digital applications in our projects. I am confident that I will use these skills I learned in my first semester of freestyle later in my life.
PHOTO HAIKU
Our first writing project we had in English was our conceptual Haikus. Our main Focus was to express the “feelings” and “experiences” in a conceptual way. Each of the students were assigned a concept statement with its own “feeling” and “experience” that we had to convey in our Haiku. I was assigned with “the feeling o paranoia through taking care of a plant”. The challenge of this assignment was making it metaphorical enough were it provides the readers with room to interpret , while also not sounding too off topic. We also had to squeeze a message within just three lines and 17 syllables as well. We then took a picture to go with our poems that help convey our message while giving a sense of ambiguity. Later, in Digital Media, we used Premiere Pro to create a Video that paired with out Haiku. We learned how to animate certain aspects of the photos and text as well as edit the audio we recorded. It was difficult, but cool to familiarize myself with this new software. I am excited to use the application in later projects as well.
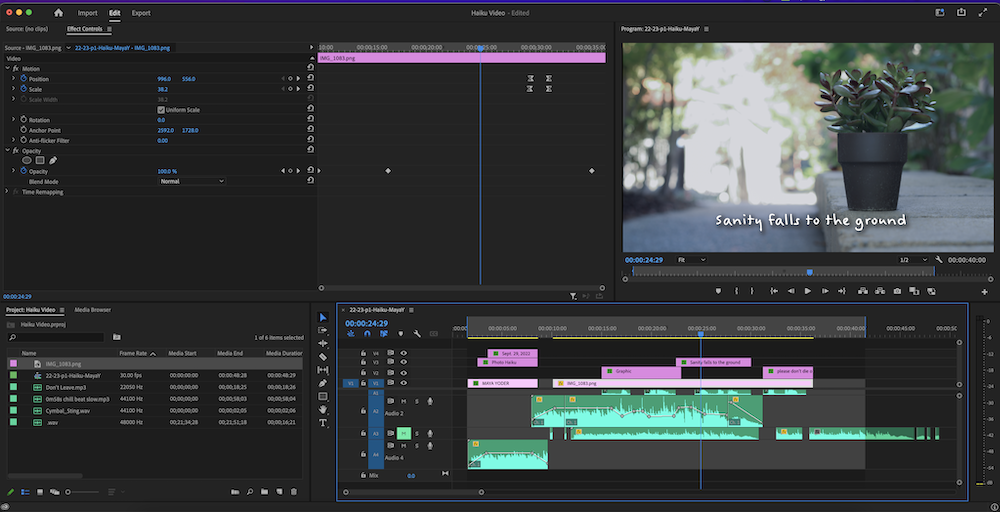
What I valued most about this project was the ability to transform my writing into a visual video. Although I like the Haiku just by itself as well, I think that the video added another layer of conceptuality that wouldn’t have been achieved with the Haiku alone. I am satisfied with how my final project turned out.
FREE VERSE POEM
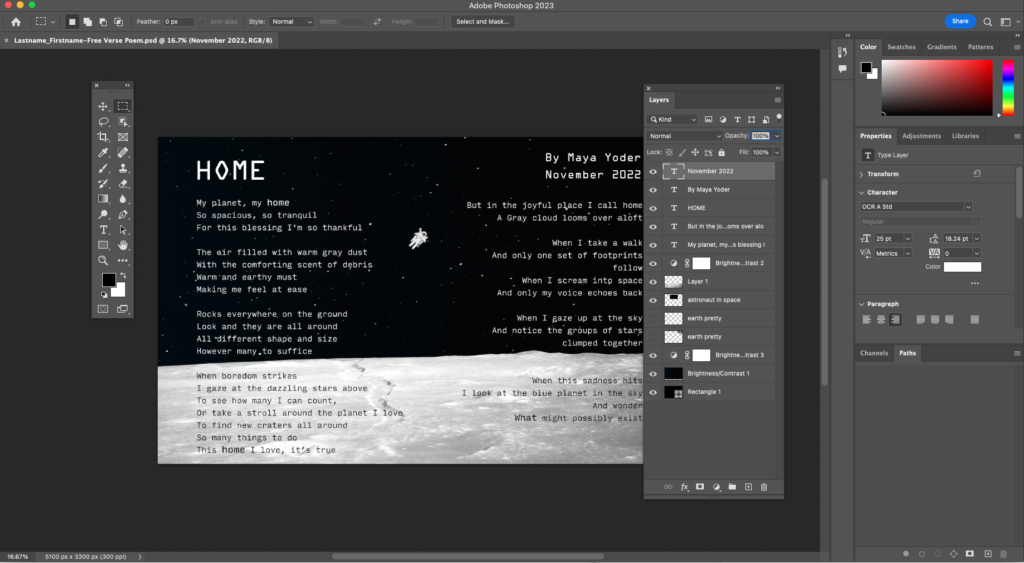
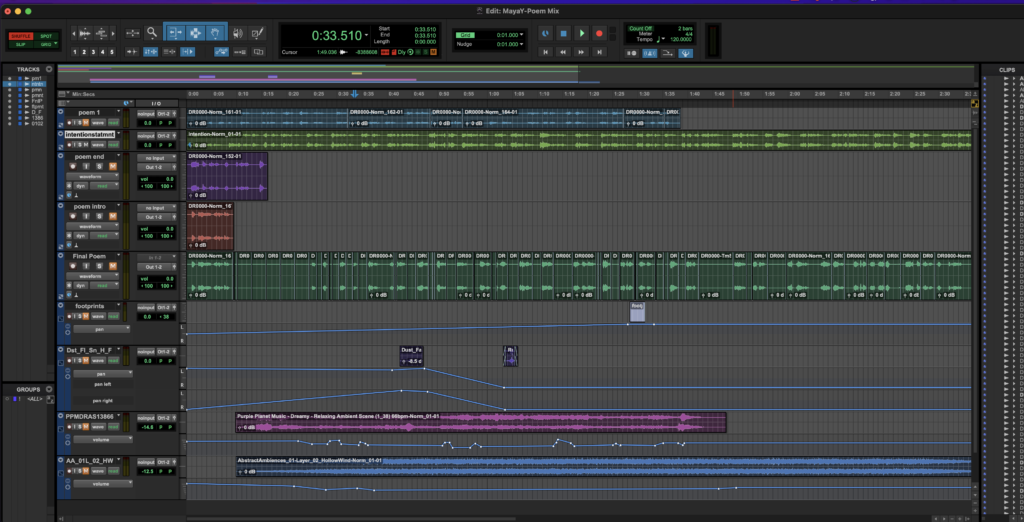
To further immerse ourselves into the idea of conceptual writing, we experimented with poetry in our next project. To start off, we read a wide range of poems, from poets like Ada Limón and Billy Collins, in order to learn about how different poetry techniques can be used. We then got to write our own poems and use the different poetry techniques. The hardest part of this project was coming up with a poem because we were free to write about anything we wanted to. Although I liked the creative freedom we got, it was hard to narrow down my different ideas into one. After we finalized our poem, we wrote an intention statement to further explain the meaning of our poemIn Digital Media, we created a visual as well as an auditory representation of the poem with the use of Adobe Photoshop and Pro Tools. First we had to record our poem and our intention statement with our Tascam Audio Recorders. Our recordings had to be expressive and loud, which was personally challenging. Then we went into the software, Pro Tools, to combine our audio, background music, and sound effects to create an auditory representation of our poem. The Pro Tools application was the hardest for me to get used to this year. I have never been interested or knowledgeable about audio editing, so I struggled with figuring out how I should creatively express myself. Although using this software was tough, I was able to create something I am proud of. Lastly, we used Photoshop to create a visual representation of our poem. I really liked creating the visual for the poem since Photoshop is one of my favorite applications to use. When creating the visual, I focused the most on aspects like font, color, and alignment. I became aware of how many aspects contribute to create a good design.
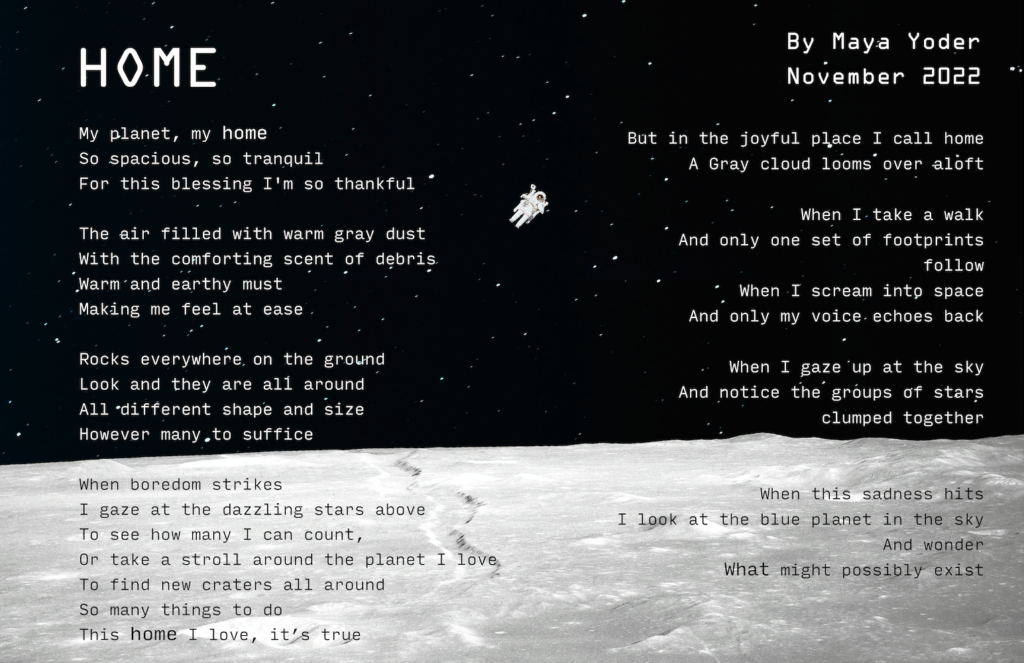
Home is a ekphrastic free verse poem about a creature on the moon who struggles with loneliness despite living a content life. The speaker in this poem, the mysterious moon creature, lists the different aspects of their peaceful life on his home planet, from what their home looks like to what they like to do in their free time.
The beginning half of the poem is based on the creature’s life and home on the moon. He gives an insight to his daylife as well as the setting of the poem. In the second and third stanzas, I used hyperbole to highlight the attitude that the creature has towards his life. Because of how simplistic and boring his description of his life is, it catches the reader off guard. However, this seemingly over exaggerated attitude is the creature’s pure feelings. The purpose of this over exaggeration is to show how different the creature’s point of view to life is to the average person. This helps the reader better understand the complex feelings that the creature mentions later in the poem.
The second half of the poem discusses the loneliness the creature mentions. During the shift of tone in this poem, I used lineation to emphasize the complex feelings the creature experiences. Before the fourth stanza, the creature describes his life in a fulfilling and peaceful way, showing his content attitude towards life.
However, when they mention their sadness, it contrasts to the previously stated attitude of satisfaction towards life. I lineated the lines by separating the sentence where the creature’s internal problem is introduced to make the reader focus on the conflict of the poem. With this use of lineation, the readers are able to notice this negative shift in tone.
In the fifth stanza, I use visual imagery to refer to the cause of the creature’s thoughts. With the imagery “one set of footsteps”, it expresses the loneliness of the creature without mentioning it directly. Because of how the creature lived on the moon alone for their whole life, they aren’t aware of the concept of loneliness. Although they aren’t aware of loneliness, that doesn’t mean that they can’t feel it. Using imagery that is associated with being lonely is a way to express the feeling without having the character be completely aware of it.
Ultimately, these poetry techniques help the reader to understand the character on a deeper level.
When writing this poem, I was inspired by an illustration I scrolled through on a digital art account on instagram. The illustration depicted an alien on the moon laying down, feet crossed, staring up into space. Although it was a simple illustration, I began to think of the moon aliens and the type of life they would live. Since there aren’t any known creatures on the moon, I imagined that the alien was the only inhabitant of the moon that hadn’t been discovered. With being the only inhabitant, my mind immediately went to think of how lonely that alien would be. I decided to explore this idea further and wrote this poem.
In the production of this poem, I took some of the poetry techniques taught in class and implemented it into the poem. One of the assignments in English class was one where we had to break up a poem into different lines and stanzas without knowing what the original poem looked like. This exercise helped me understand the importance of lineation and how it can shape the poem’s delivery and meaning. With this in mind, I put thought into how the sentences were broken up, and how each idea should be separated or combined.
I want the reader to consider how despite the positive attitude the creature has, it isn’t realistic for them to have a positive outlook on all aspects of life. No matter how happy a person may seem, they can struggle with problems on the inside. I want to make the reader relate to the alien who struggles with staying happy all the time. After all, struggling with staying positive in life is a normal thing to go through.
In this Project, I was able to produce my poetry in many different formats. When I think of poems, I just think of them as words on paper, but I realized that you can deliver poetry through different mediums as well. What I like about Freestyle is being able to create art in ways you wouldn’t usually do. I am excited to try out even more mediums and applications in the future.
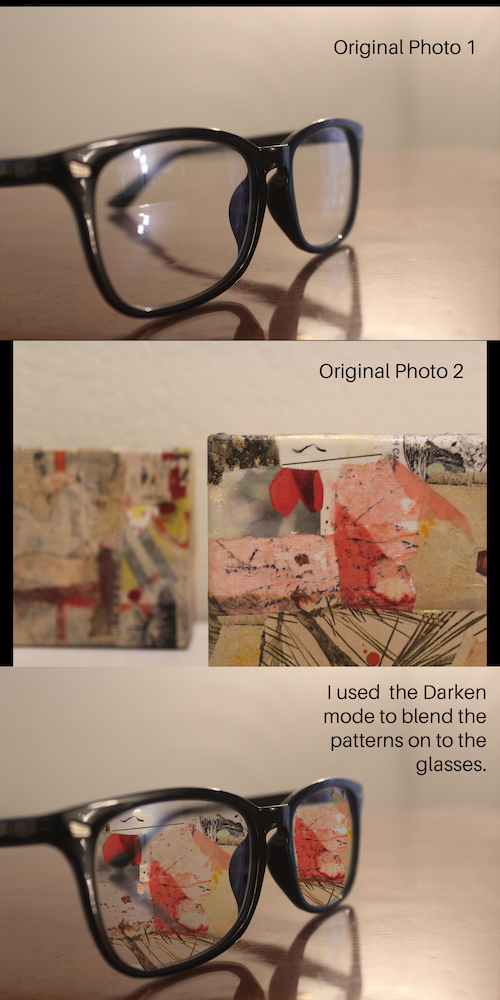
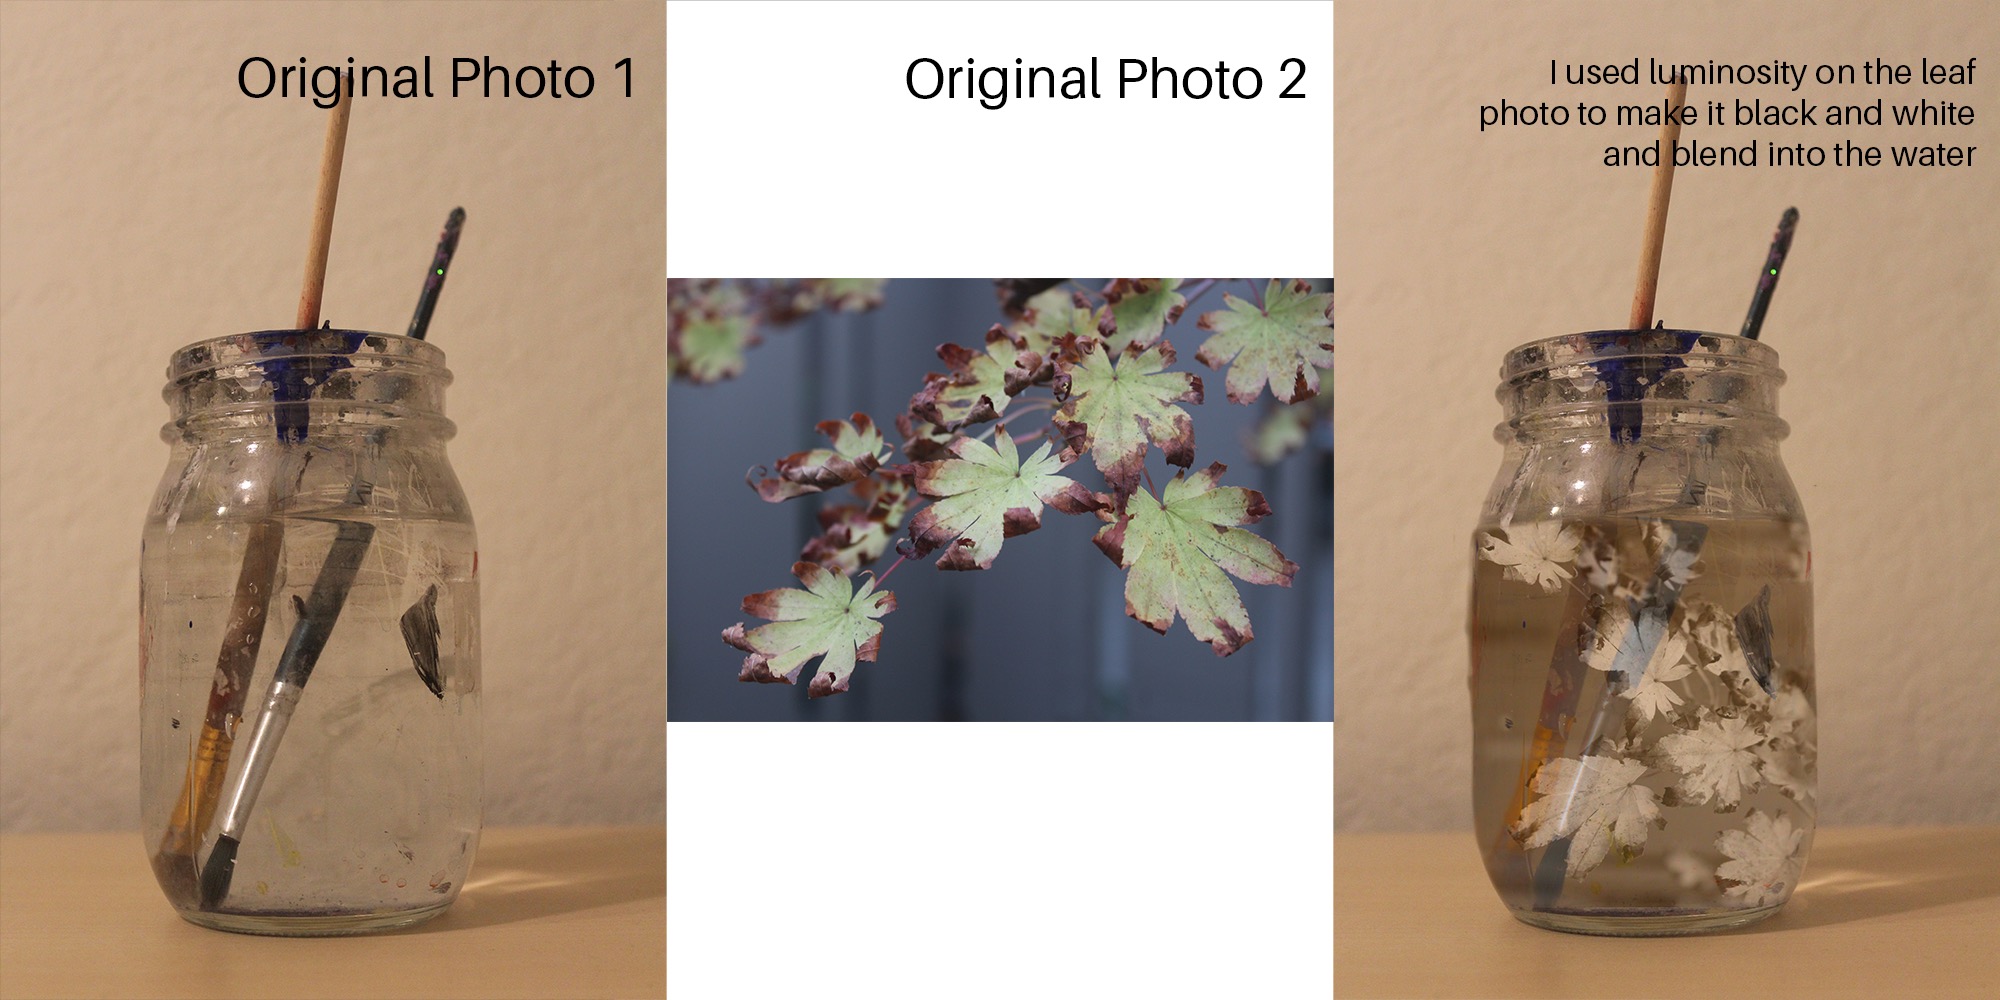
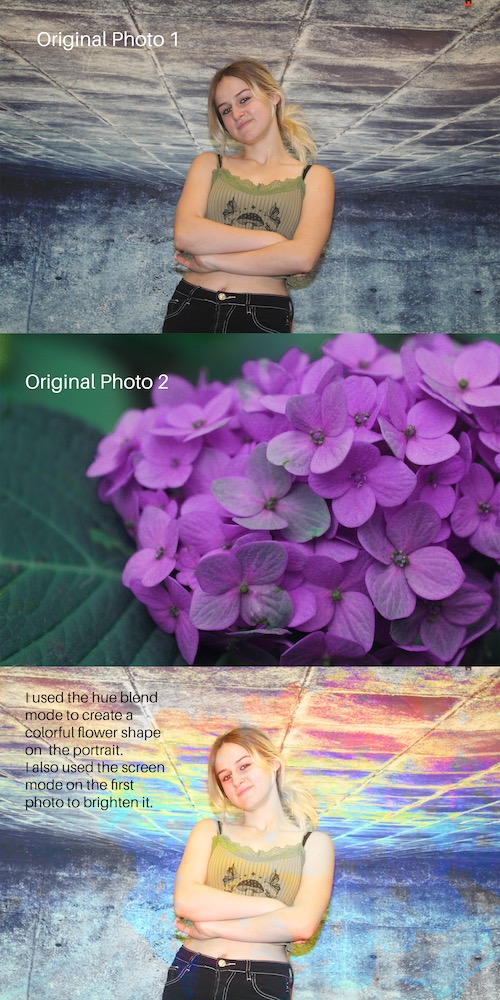
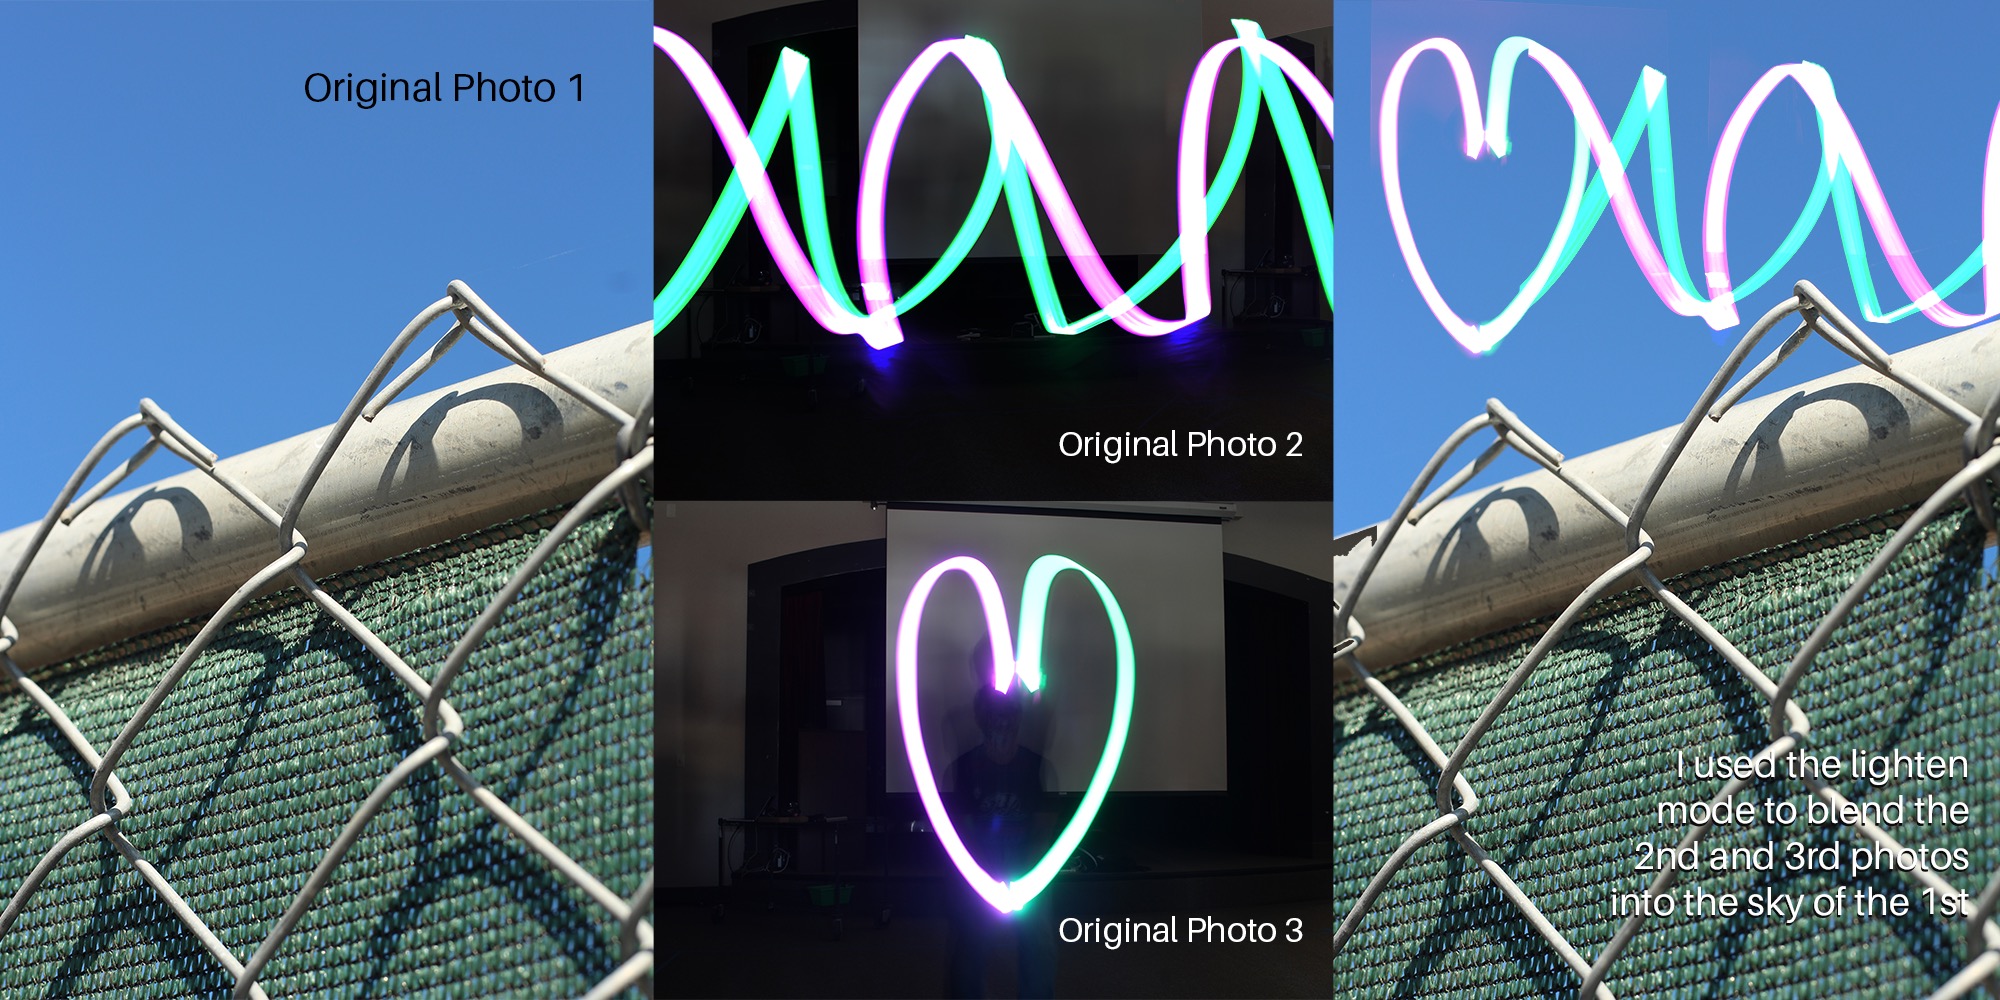
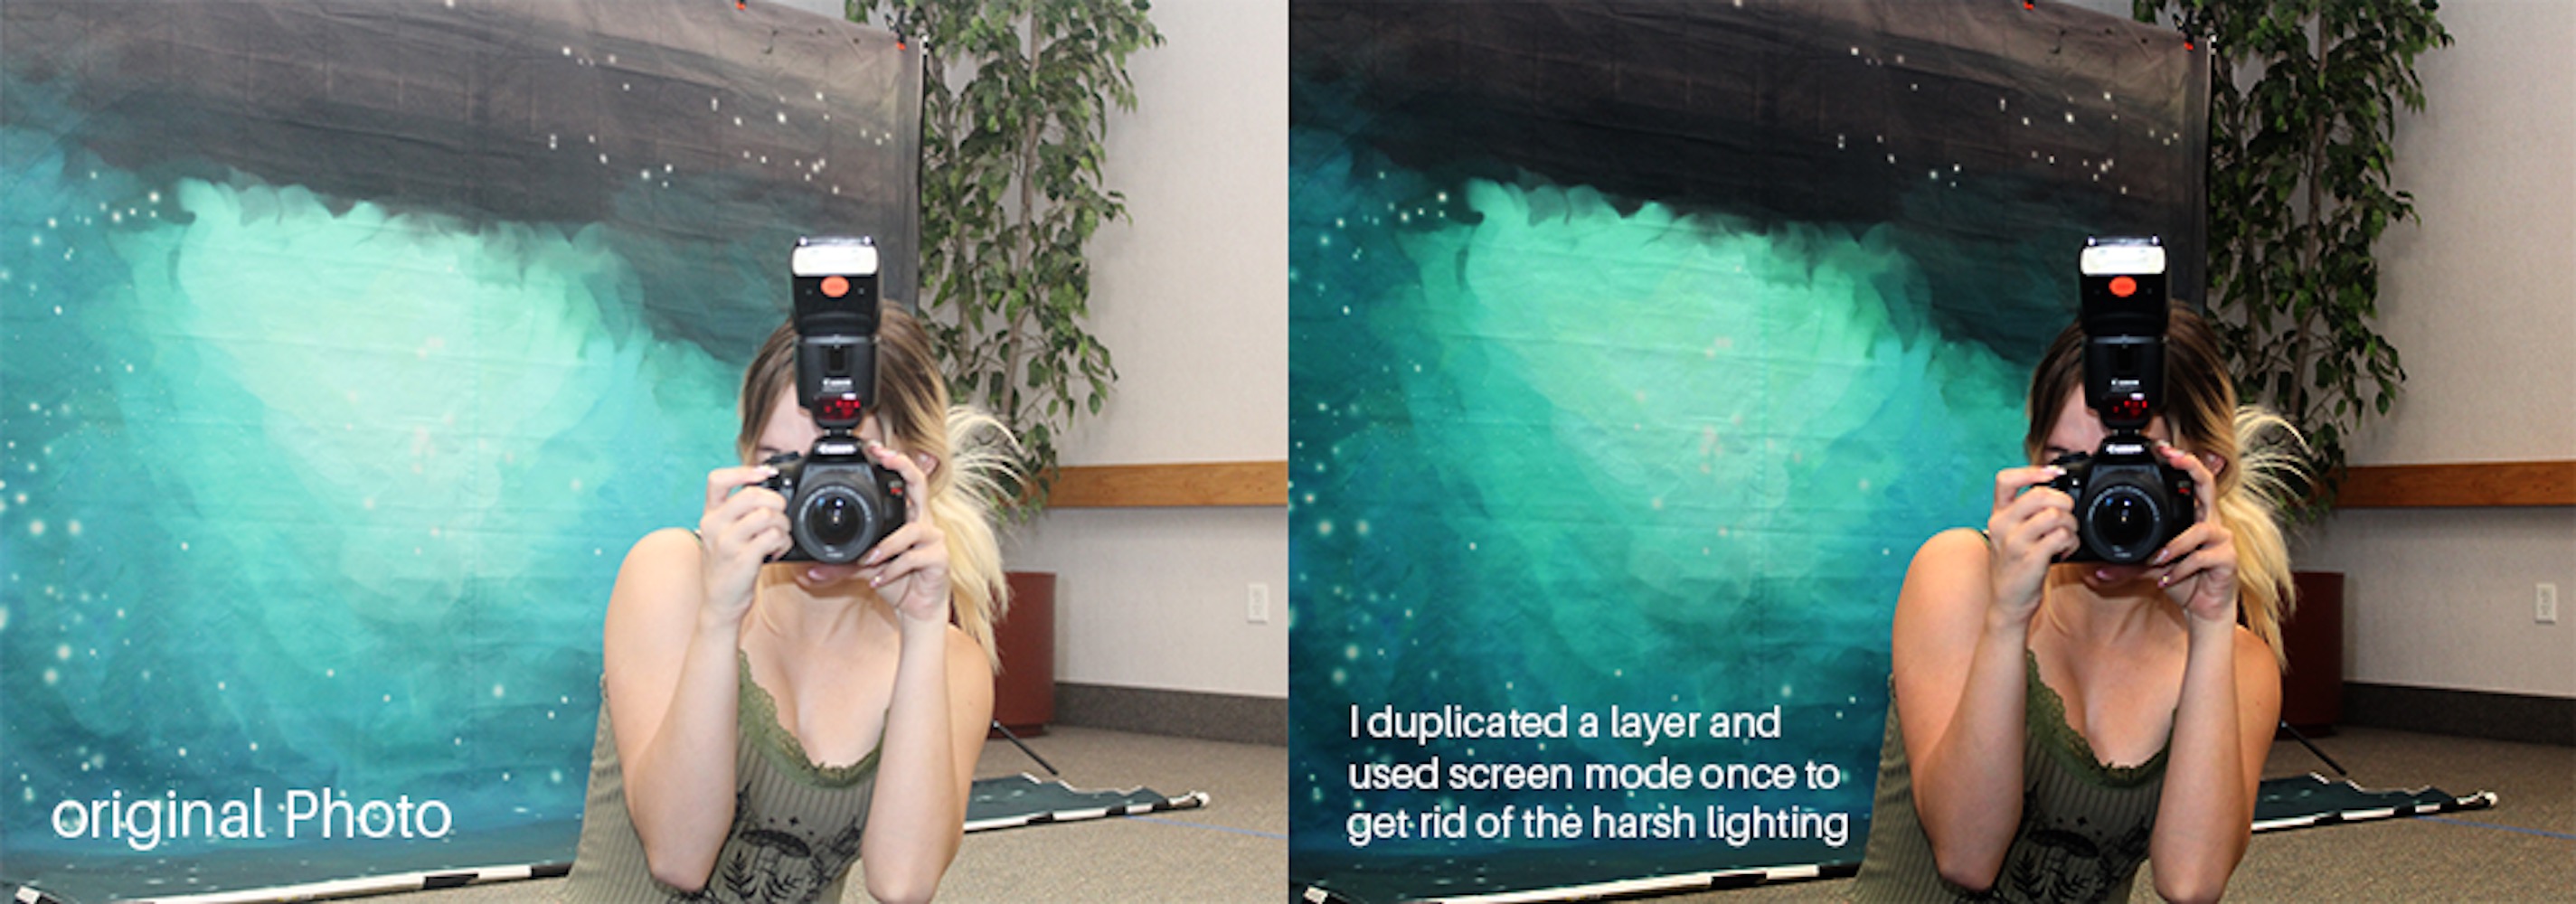
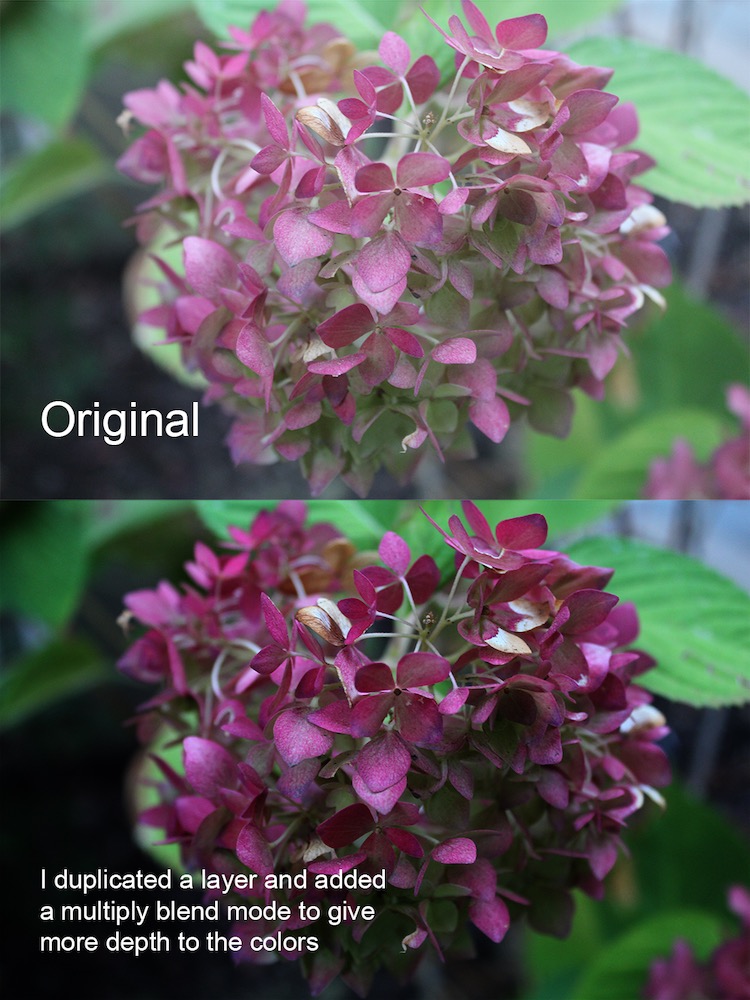
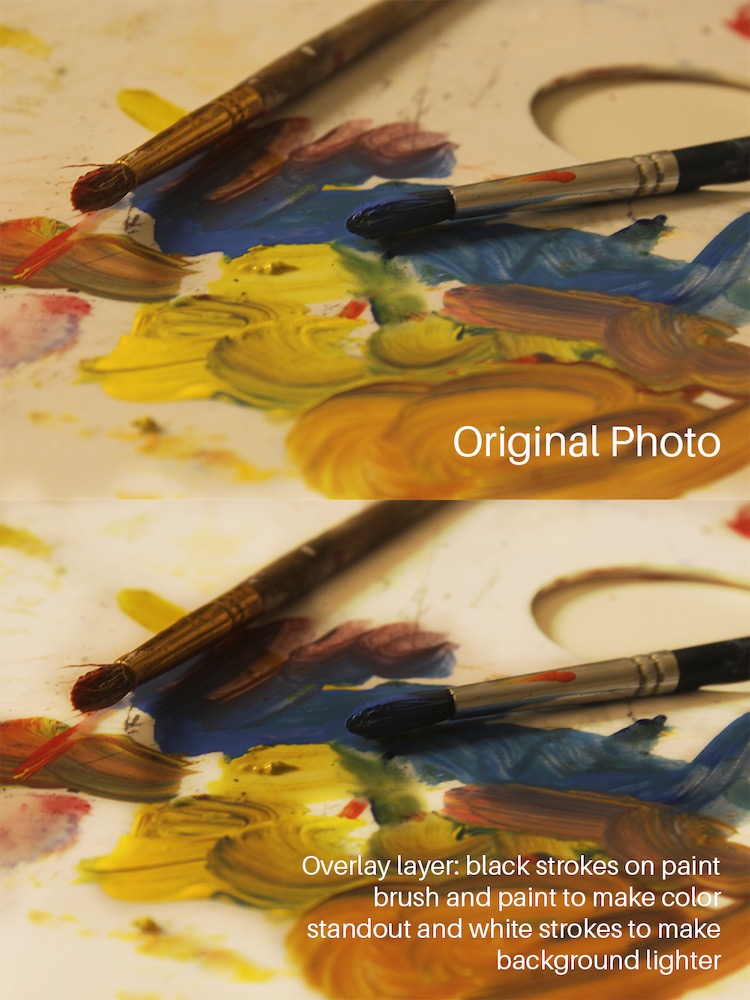
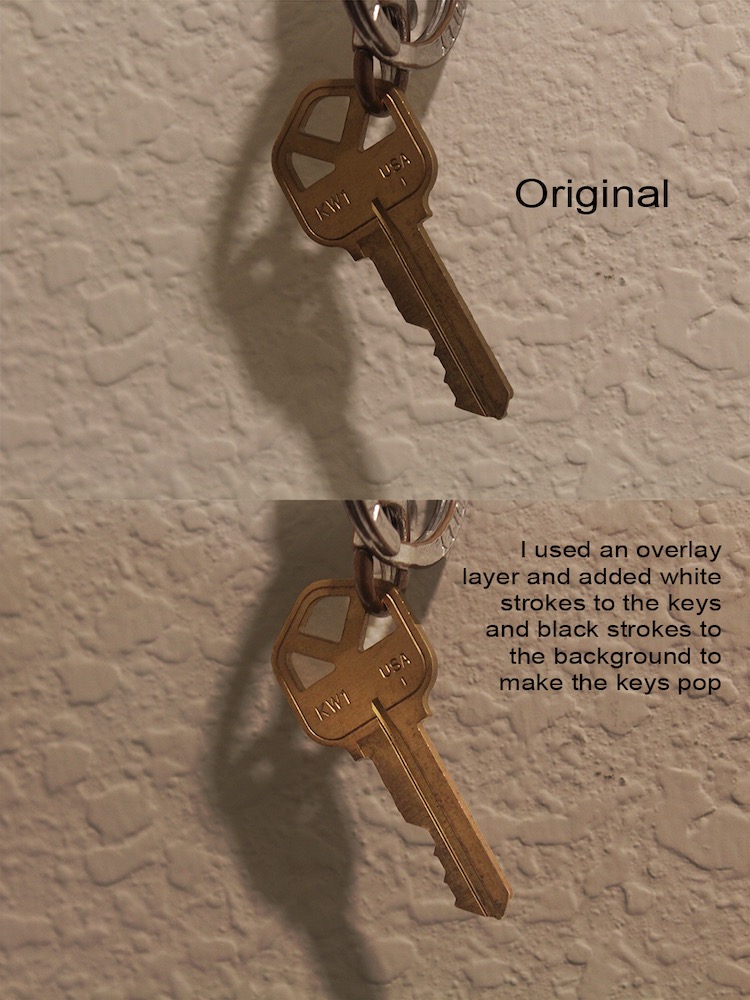
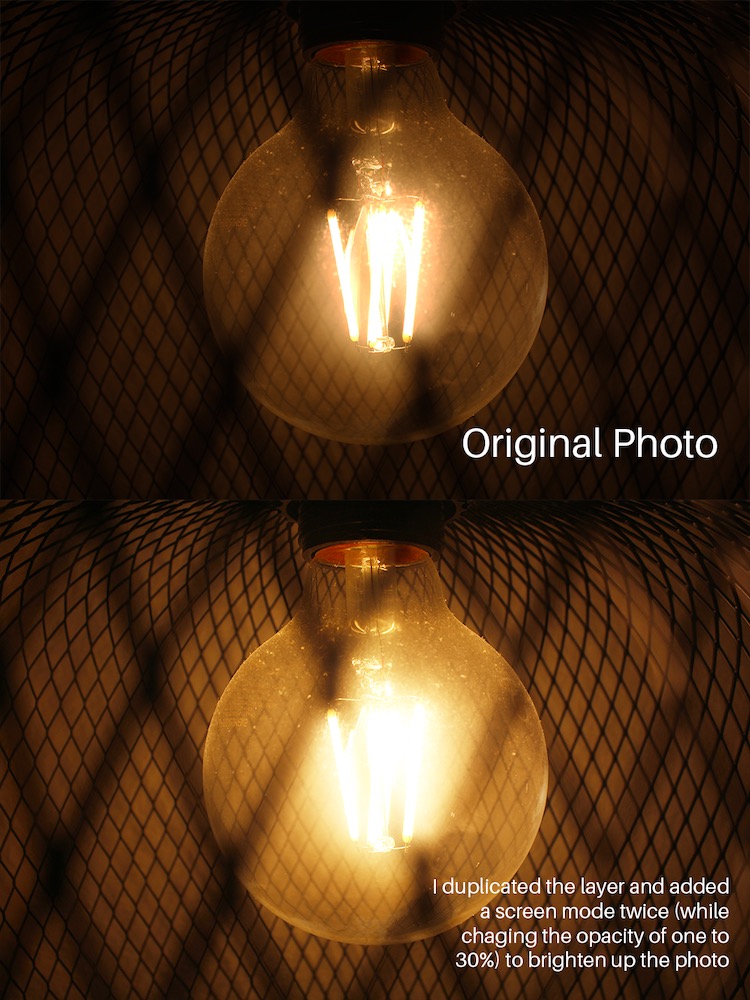
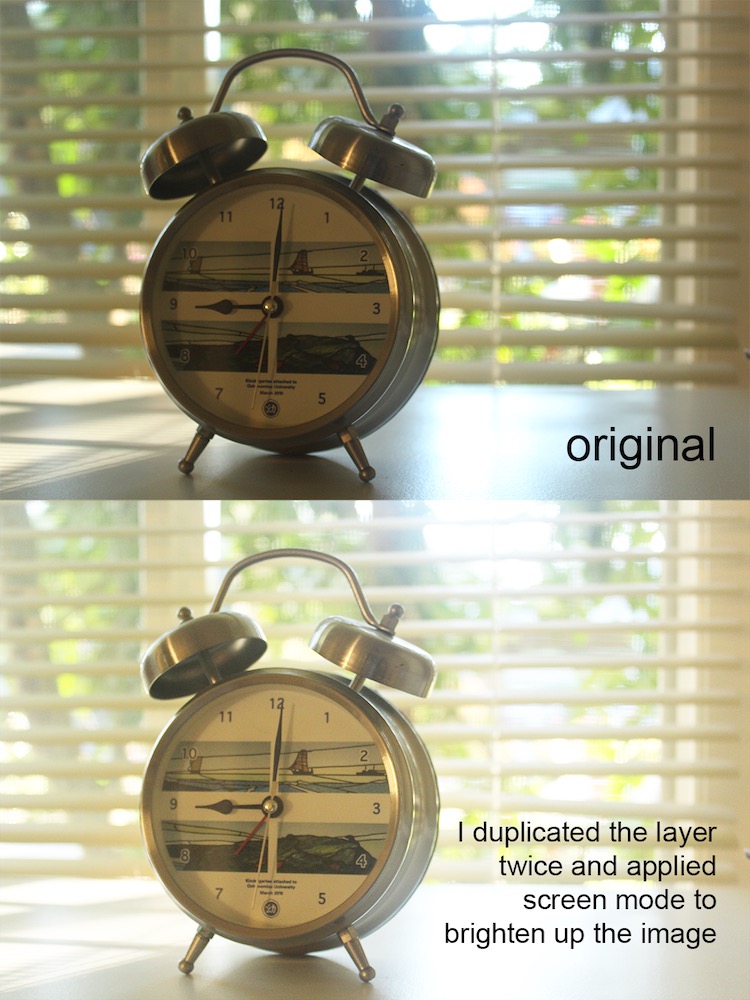
PHOTOSHOP BLEND MODE EDITING
With our new DSLR Camera, Freestyle students were taught how to use the camera. We were taught how to use the shutter-speed, the aperture, the white balance, etc. Although these settings can help you take your ideal photo, photos don’t always turn out the way you want them to. For example, your photo may be too bright or too dark to your taste.To fix this common problem, you can use Photoshop blend modes.
I value how I learned different ways to use photoshop blend modes, for example brightening photos, darkening photos, and even blending photos. I liked how I got to learn the basics as well as explore different blend modes in different ways. I see myself using these photoshop skills to mostly blend two photos together and make my photos more fun. I also see myself using it to fix photos that are too bright or dark.
NAME PHOTOGRAPHY
In our design class, our main focus was getting used to using our DSLR Camera as well as Photoshopping the photos we took. One of the assignments included taking pictures of objects that look like letters then arranging it into our names. When I first heard the instructions, I was confused on how we can make random objects look like the letters of the alphabet. However, I later saw the completed projects of past students work and was mesmerized by how cool it looked. For the project, we needed to look for each letter in our first name in the different objects we found. Then we had to edit the photo in Photoshop to make the letters pop out from the background. Lastly, we make the photos black and white, then lay it out on our final document.
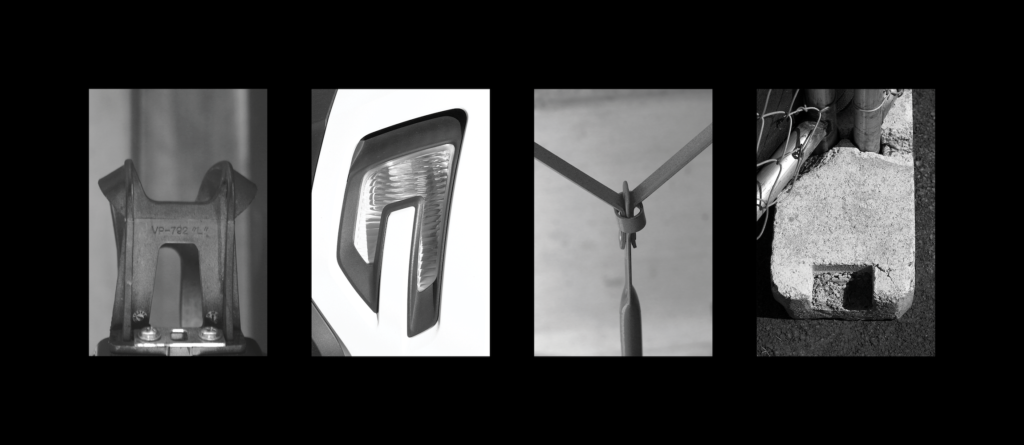
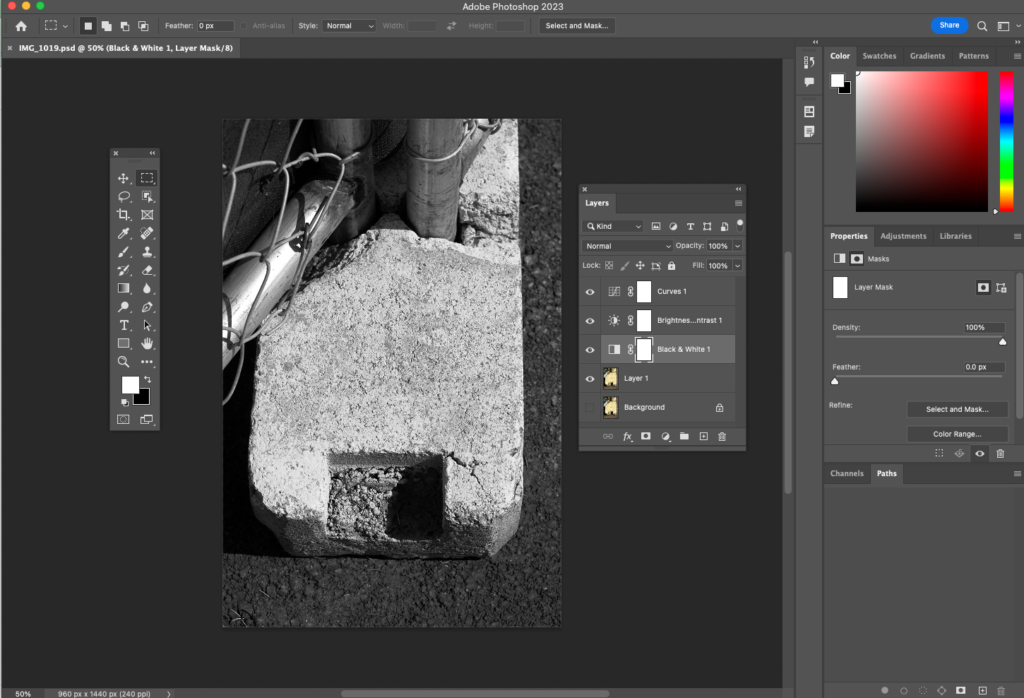
The hardest part of this project was looking for letters in random everyday objects. I especially had a difficult time looking for the letter M. Although I only had 3 letters to look for, I found it challenging. Another challenge I faced was editing some of the photos to make the letters pop. Although it might not seem like much work, editing really does make a big difference in how your photos look. When taking the M photo, I didn’t realize that the object and the background were really similar in color. This meant that the computer had a hard time differentiating the 2 objects, making it harder to isolate just the letter portion. I was able to overcome this with paying around with the curves, which adjust the light and dark parts of the photo at the same time. I also used other adjustment layers like exposure and color balance. Although it took a lot of adjusting and time, I was able to make each of the letters pop out in the 4 photos.
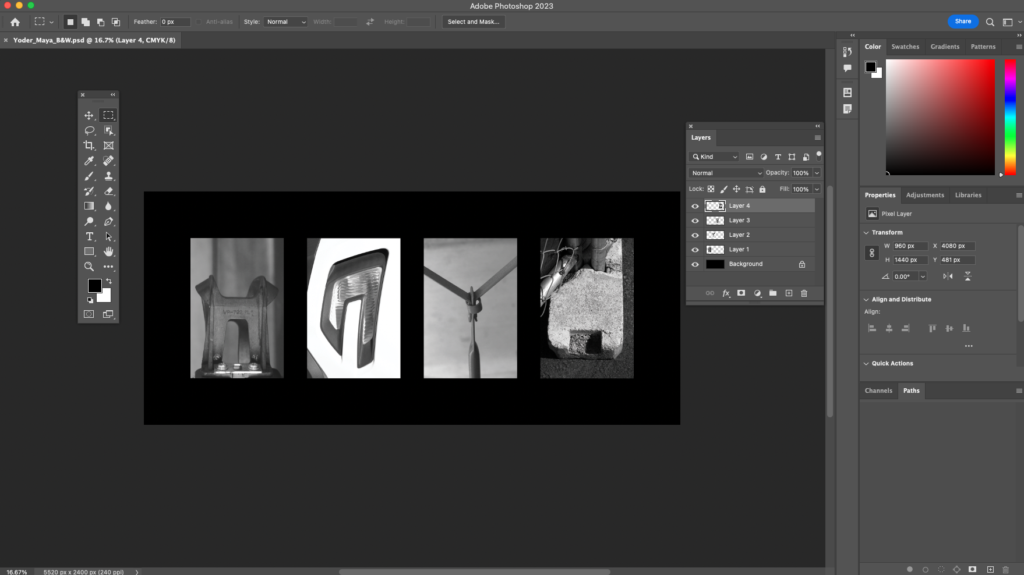
Through this project, I was able to learn about the different ways I can use Photoshop to edit my photos. Although I had some experience with photoshop, weirdly enough, I never used the application to edit the photos I took. This was my first time hearing about the use of adjustment layers. Adjustment layers allow you to edit parts of the photo without altering the original photo layer. This allows for a non destructive editing process, making it less likely messing up your photo.
CONCEPTUAL PHOTO
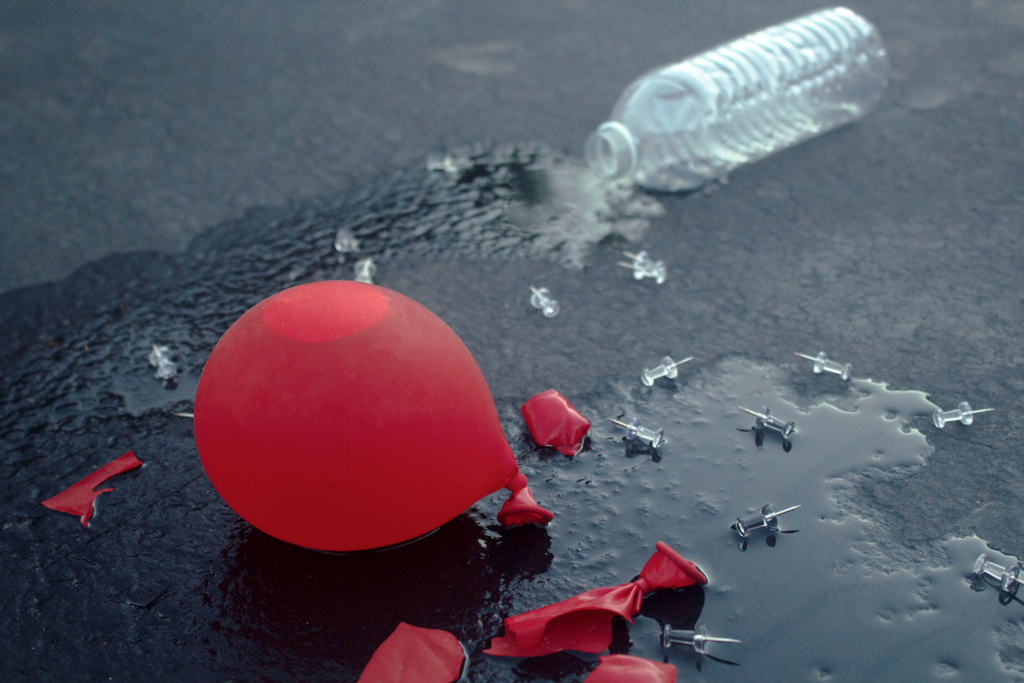
Our main project for our design class was the conceptual Photography project. In english, every student was assigned with a concept statement. As I said before, I was assigned with “the feeling of paranoia through taking care of a plant”. Although you may think I could just take a picture of a plant for my project, the main focus of this Project was making the photo conceptual. This meant that you had to be metaphorical in what you take, but still reference the concept statement at the same time. This basically meant that I couldn’t utilize plants in my photo, which was an important aspect in expressing the feeling of paranoia.
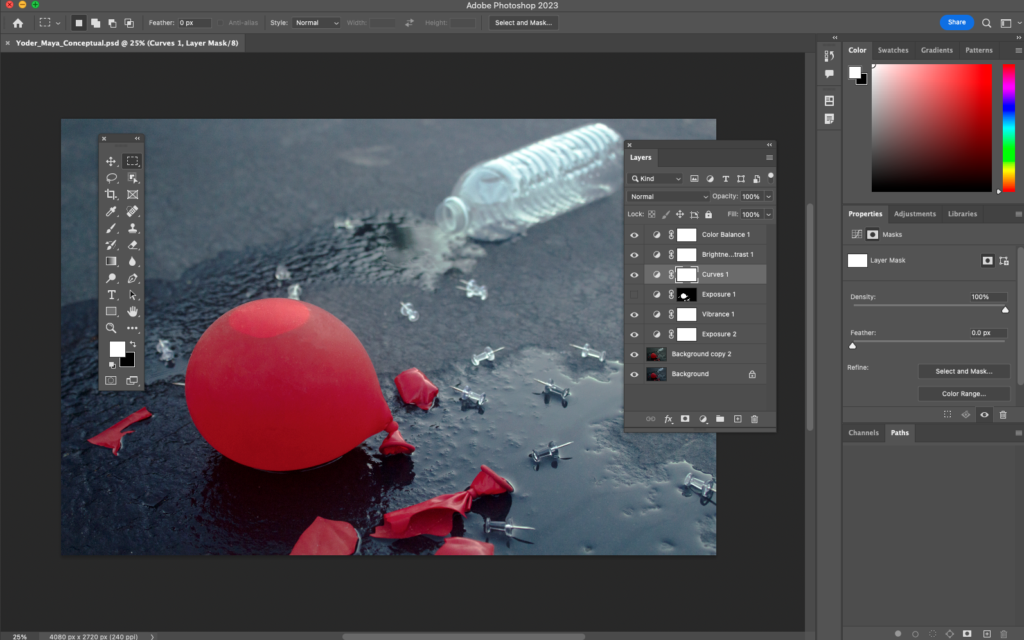
For my Conceptual Photo project, the items I used to convey my concept statement were a water balloon and an empty water bottle. The water balloon in the front of the photo is used to represent paranoia. Since a balloon is an object that easily breaks, it connects to how paranoia can make you feel more vulnerable than you actually are. With the pins and the broken balloon pieces around the balloon, it helps emphasize the threat one with paranoia feels. The second object, the empty water bottle, represents the failure to take care of something. Since water is vital to life, the water being spilled from the bottle shows the loss of being able to sustain life. I chose to use a low angle to have the water balloon as the forefront of the photo, and I focused on it to show how paranoia can overtake one’s mind. I used the rule of thirds to choose the placement of the bottle and balloon, and I used the running water to help bring the two objects together despite being apart. The dry pavement used as a background connects to the lack of water aspect.
When editing this photo, I learned about many new tools in Photoshop. The most important ones were adjustment layers, which can be used to edit in a non destructive way, and the healing brush, which can be used to cover up blemishes. I used the adjustment layer on specifically the balloon to turn up its exposure to have it pop out more. I used the healing brush to get rid of the dust that was on the balloon as well as a few pebbles on the ground.
While taking our photo, we had to be conscious of many aspects, like the layout, the lighting, the focus of the camera, and even the background. While taking my photo, a challenge I faced was focusing on the object with the camera. Although there was an Automatic Focus option on our camera, we were encouraged to get used to the Manual Focus function. When I exported my photos to my computer, I realized that a majority of them were blurry. I had to go out and retake my photos, this time paying attention to my focus. The second attempts turned out so much better than the first.