
Photoshop Blending Modes Images
For this project we needed to take many photos and convert them in whatever way we wanted. There were some guide lines but for the last four images it was all free for us to choose. This project helped me to understand the basics of photoshop. This was a tough task since we only got a few class days to do this and needed to create ten photos. I managed to complete the project on time due to the better time managing skills I was taught.
Blending Mode 1For this edited photo I used the screen blending mode in order to lighten the image. Before when looking at the photo, the viewer would lock his or her eyes on the brightest parts without recognizing the rest of the photo. That's why I decided to lighten the darker parts of the photo. This choice helped bring out the contrast.
Blending Mode 2For this image I created four layers using the screen blending tool. This created a lighter layer each time and finally gave me the result I wanted. I wanted the sunset to show yet not make the foreground too light because each time you duplicate the image it causes the photo to get lighter.
Multiply mode 1The original photo was overexposed and had very bright colors which did not appeal to me. So I used the multiply blending mode to change this contrast. This gave the image a darker take and highlighted the parts of the photo in better places.
Multiply mode 2I used the multiply blend mode which darkens the photo multiple times. By duplicating the layers it would make the photo less over exposed because of the lighting. Darkening the photo also made the image reveal less details which created the mood I was looking for (the water droplets looked like stars).
Blending 2 photos 1For this combined photo I used the skills I gather from previous assignments by lightening the photo. Then combined the photos and blended them together.
Blending 2 photos 2The first step was to edit the background of the photo so it would be darker with more value. Next I took the photo of the water droplets and put it on top of the other one. Finally, I blended both photos together to get the final product.
Overlay and Brush Blending 1For this image I decided to add more shading to the photo because the face was too bright in some places because of the direction of the sun. As it was a golden hour all of the imperfections were showing a little and I wanted to give a little bit of a touchup. Using the paintbrush tool I was able to use a specific color and brush over the places that were a little off.
Overlay and Brush Blending 2This edited photo is a little darker than the original piece in some places. I didn't only use overlay because I wanted specific places in the photo to be a darker color. Using the Brush tool I adjusted the opacity so it is not fully black when I paint it on, then I darkened the photo as I wished.
Creative Blend Mode 1 and 2
Creative Blend mode 1 Creative Blend Mode 2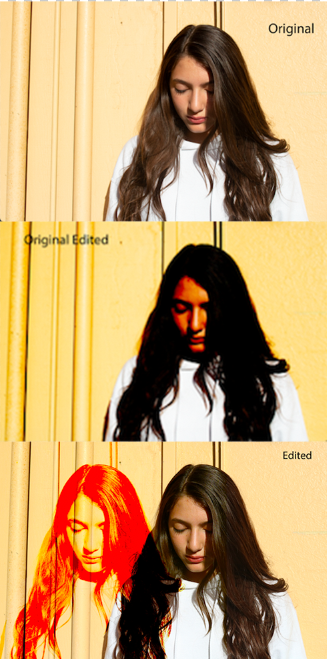
For this image I decided to take a more daring approach and it also took me the longest to create. I used all the skills I learned in the past, first the blending mode color burn to make the top photo look more rustic. After that I lighted the photo to make it more transparent. Finally, I edited the photo in places where the coloring looked bad and filled in parts which didn't make sense to this concept. (Photo on the left) I chose a photo for the background and edited it to my liking by changing the blending tools: lie vivid light in order to lighten and hard light to make the final product start to emerge. Then I moved on to the next step where I chose to use a different photo to place on top. With that I used multiply blending mode only on the top layer to make all of the darker colors pop out. Then I used the coloring tools to make the two photos totally blend together. (Photo on the right)

In this project we mostly learned how to use specific modes and editing tools and to build up from our past findings. So, we would learn one thing and with that we were able to create and express ourselves more actively and more exactly . This assignment was important especially so we could all learn photoshop. At first I was learning from the videos Mr. Flow posted but after a while I didn’t have to used them anymore and I mastered those specific skills.